3 Upgrading Oracle Database
Oracle provides a comprehensive set of tools for upgrading Oracle Database with minimal downtime and for migrating your applications to the new release.
This chapter contains the following topics:
-
Manually Upgrading a Multitenant Container Oracle Database (CDB)
-
About the catupgrd.sql Script in Earlier Releases of Oracle Database
-
About Transporting and Upgrading a Database (Full Transportable Export/Import)
Caution:
If you retain the old Oracle software, then never start the upgraded database with the old Oracle software. Only start the database with the executables in the new Oracle Database installation.
3.1 Upgrade Strategies for Oracle Database
Starting with Oracle Database 12c, multitenant architecture enables an Oracle database to function as a multitenant container database (CDB) with pluggable databases. All Oracle Database releases earlier than Oracle Database 12c were non-CDB. See Oracle Database Concepts for an overview of multitenant architecture.
This release provides more strategies for upgrading. After upgrading an earlier release to Oracle Database 12c, you can plug the upgraded database into a CDB as described in "Upgrading an Earlier Release and Plugging a PDB into a CDB."
Important:
You cannot downgrade a database once you have set the compatible initialization parameter to 12.1.0.2. Only if the compatibility is set to 12.1.0.1 will a downgrade be possible for a pluggable database (PDB), and there may still be restrictions on downgrading. See Chapter 6, "Downgrading Oracle Database to an Earlier Release."
This section contains the following topics:
See Also:
Oracle Database Administrator's Guide for complete information about creating and configuring a CDB and Oracle Database Concepts for an overview of multitenant architecture3.1.1 Upgrading a Non-CDB Oracle Database
A non-CDB Oracle Database does not use the multitenant architecture and does not contain pluggable databases (PDBs). You can upgrade the database with Oracle Database Upgrade Assistant (DBUA) or manually. Follow the procedures in "Upgrading with Oracle Database Upgrade Assistant (DBUA)," or "Manually Upgrading a Non-CDB Oracle Database."
3.1.2 Upgrading an Earlier Release and Plugging a PDB into a CDB
You can upgrade earlier releases of Oracle Database using either DBUA or the Parallel Upgrade Utility and then plug the upgraded database into a multitenant container database (CDB). The upgraded release 12.1 database can be plugged into an existing CDB. Be sure to follow any necessary pre-upgrade procedures described in Chapter 2, "Preparing to Upgrade Oracle Database." The following procedure assumes that both databases are on the same system.
See Also:
Oracle Database Administrator's Guide for information about creating and removing PDBs with SQL*Plus, and Oracle Database Administrator's Guide for examples of various scenarios with different factors.To upgrade a database and plug it into a CDB:
-
Install the new Oracle Database 12c software. See Oracle Database Installation Guide for your operating system platform.
-
Upgrade the database as described in this guide. See Chapter 3, "Upgrading Oracle Database."
-
Set the
COMPATIBLEparameter to 12.0.0, if you have not already done so as part of the upgrade process. See "The COMPATIBLE Initialization Parameter in Oracle Database." -
Make sure the database is in read-only mode.
SQL> startup mount
SQL> alter database open read only;
-
Ensure that the prerequisites for plugging an unplugged PDB are met. See Oracle Database Administrator's Guide for information about using the
DBMS_PDB.CHECK_PLUG_COMPATIBILITYfunction to determine whether these requirements are met. -
Create the XML file for the PDB. The root name for the XML file matches the name of the PDB. The
pathto the location can be anything you choose. This location is where the XML file will be saved.SQL> exec DBMS_PDB.DESCRIBE('path/PDB1.xml'); -
Shut down the database.
SQL> SHUTDOWN IMMEDIATE
-
Plug the database into the CDB.
SQL> CREATE PLUGGABLE DATABASE PDB1 USING 'path/PDB1.xml' NOCOPY TEMPFILE REUSE;
In this example, the PDB is named
PDB1. You can use any name, but the name must be unique for this CDB.This example also assumes that the data files remain in the same location as they were when the database was standalone. If the data files have been copied to a different location (for example, stored with Oracle ASM), then the parameter
SOURCE_FILE_NAME_CONVERTmust be specified. See Oracle Database Administrator's Guide for an example of using theSOURCE_FILE_NAME_CONVERTclause.TEMPFILEREUSEspecifies that the existing TEMP tablespaces can be reused.You should see "
Pluggable database created." The upgraded database is now a PDB ready for the CDB. -
Connect to the PDB using a previously configured listener. The name of the PDB in this example is
PDB1.SQL> sys/oracle@PDB1 as sysdba
You can alternatively connect to the PDB as follows:
SQL> ALTER SESSION set container=PDB1;
-
Convert the dictionary to the PDB type. From the
admindirectory, run thenoncdb_to_pdb.sqlscript. This script must be run before the PDB can be opened for the first time.@$ORACLE_HOME/rdbms/admin/noncdb_to_pdb.sql
-
Startup and open the new PDB in read/write mode. You must open the new PDB in read/write mode for Oracle Database to complete the integration of the new PDB into the CDB. See Oracle Database Administrator's Guide for more information about modifying the open mode of PDBs with the
STARTUPSQL*Plus command.SQL> STARTUP PLUGGABLE DATABASE PDB1 OPEN;
-
Back up the PDB. See Oracle Database Backup and Recovery User's Guide for information about backing up a PDB.
3.1.3 Upgrading a Multitenant (CDB) Oracle Database
Starting with Oracle Database 12c, Oracle provides multitenant architecture, which enables the creation and administration of pluggable databases (PDBs). You can upgrade the CDB with Oracle Database Upgrade Assistant (DBUA) or manually, as you would a non-CDB database. Follow the procedures in "Upgrading with Oracle Database Upgrade Assistant (DBUA)," or "Manually Upgrading a Multitenant Container Oracle Database (CDB)."
3.1.4 Upgrading a Pluggable Database (PDB)
A CDB can contain zero, one, or more pluggable databases (PDBs). You can upgrade one PDB without upgrading the whole CDB. For example, you can unplug a PDB from a release 12.1.0.1 CDB, plug it into a release 12.1.0.2 CDB, and then upgrade that PDB to release 12.1.0.2. You cannot use DBUA to upgrade a PDB; therefore you can manually upgrade the PDB. Follow the procedure in this section, and for more information see "Manually Upgrading a Multitenant Container Oracle Database (CDB)."
Note:
A PDB cannot be recovered unless it is backed up. After upgrading using the method of creating a CDB and plugging in a database, be sure to back up the PDB. See Oracle Database Backup and Recovery User's Guide for information about backing up a PDB.- Step 1 Prepare the release 12.1.0.1 PDB
-
In this step you prepare the PDB you want to upgrade to release 12.1.0.2.
-
In the release 12.1.0.1 environment, switch to the PDB you want to upgrade. For example, PDB1:
SQL> alter session set container=PDB1;
-
Run the preupgrade script from the release 12.1.0.2 environment to generate fixup scripts:
@$ORACLE_HOME_12102/rdbms/admin/preupgrd.sql
The output of the preupgrade.log includes the location of the fixup scripts. The log files and fixup scripts will be created under ORACLE_BASE/cfgtoollogs, if ORACLE_BASE is defined. If ORACLE_BASE is not defined, then the files will be created under ORACLE_HOME/cfgtoollogs instead of ORACLE_BASE/cfgtoollogs.
To view the PDB-only output, see
cfgtoollogs/SID/preupgrade/pdbfiles. The PDB files are first written topreupgrade/pdbfilesand then concatenated topreupgrade.log,preupgrade_fixups.sql, andpostupgrade_fixups.sqlin thecfgtoollogs/SID/preupgradedirectory. -
Run the fixup script as follows:
@$ORACLE_BASE/cfgtoollogs/CDB1/preupgrade/preupgrade_fixups.sqlNote:
You must be connected to the PDB before you runpreupgrade_fixups.sql. -
To decrease the amount of downtime during upgrade, gather optimizer statistics as follows:
SQL> exec dbms_stats.gather_dictionary_stats;
At this time, also apply any additional recommendations from the preupgrade.log.
-
Switch to the CDB root container:
SQL> alter session set container=CDB$ROOT;
-
Close the PDB, in this example
PDB1:SQL> alter pluggable database PDB1 close;
-
Unplug
PDB1and stage it so it can be plugged into the 12.1.0.2 CDB. Then exit this CDB when finished. For example:SQL> alter pluggable database PDB1 unplug into '/stage/PDB1.xml'; SQL> exit
You are now ready to plug the standalone PDB in to the release 12.1.0.2 CDB, as described in "Plug the PDB into the 12.1.0.2 CDB."
-
- Step 2 Plug the PDB into the 12.1.0.2 CDB
-
In this step you plug the PDB that you prepared in Step 1 in to the release 12.1.0.2 CDB. The example uses a PDB named
PDB1. Note that when you ran DBCA for release 12.1.0.2, the compatible parameter was set to 12.1.0.2 by default. If you changed the compatible parameter to an earlier release, then you must set it to 12.1.0.2 in order to perform the upgrade.-
Connect to the release 12.1.0.2 CDB:
SQL> alter session set container=CDB$ROOT;
-
Create the 12.1.0.2 PDB using the staged 12.1.0.1 PDB:
SQL> create pluggable database PDB1 using '/stage/PDB1.xml'
file_name_convert=('/oradata/CDB1/PDB1', '/oradata/CDB2/PDB1');
See Also:
Oracle Database Administrator's Guide for information about creating PDBs with SQL*Plus -
Open the PDB in upgrade mode:
SQL> alter pluggable database PDB1 open upgrade;
-
Exit SQL*Plus in order to run the Parallel Upgrade Utility, which is a Perl script, in Step 3.
SQL> Exit
-
- Step 3 Upgrade the PDB
-
In this step you run the Parallel Upgrade Utility and the fixup scripts to complete the upgrade.
-
From the command prompt, change to the admin directory of the 12.1.0.2 Oracle home:
cd $ORACLE_HOME/rdbms/admin
-
Run the Parallel Upgrade Utility,
catctl.pl. Use the syntax you normally use withcatctl.pl, except that you must use the-cPDBnameoption to specify which PDB you are upgrading. Capitalize the name of your PDB as shown in the example usingPDB1.$ORACLE_HOME/perl/bin/perl catctl.pl -c "PDB1" -l /home/oracle/upgrade catupgrd.sql
Refer to "Parallel Upgrade Utility (catctl.pl) Parameters" for information about the syntax for
catctl.pl. -
Log in to SQL*Plus and start the PDB to run required scripts and the post-upgrade fixup scripts.
SQL> alter session set container=PDB1;
SQL> startup
-
Run
utlrp.sqlto compile objects.@?/rdbms/admin/utlrp.sql
-
Run the post-upgrade fixup scripts to complete the upgrade. (Make sure you are connected to the PDB.)
$ORACLE_BASE/cfgtoollogs/CDB1/preupgrade/postupgrade_fixups.sql
If ORACLE_BASE is not set, the files will be created under
$ORACLE_HOME/cfgtoollogsinstead of$ORACLE_BASE/cfgtoollogs.
Note:
-
If you move either a PDB or any other stand-alone database from server A to server B, you must copy the
postupgrade_fixups.sqlscript to the new location to execute it post-upgrade in the new environment. -
The post-upgrade fixup script for the specified PDB is located in
preupgrade/pdbfiles/postupgrade_fixups.PDB NAME.sqland its contents are concatenated topreupgrade/postupgrade_fixups.sql.
-
Repeat the steps to upgrade multiple PDBs. When you run catctl.pl you can specify all the PDBs at once as follows:
$ORACLE_HOME/perl/bin/perl catctl.pl -c "PDB1, PDB2" -l /home/oracle/upgrade
 catupgrd.sql
3.2 Upgrading with Oracle Database Upgrade Assistant (DBUA)
Database Upgrade Assistant (DBUA) provides a graphical user interface to guide you through the upgrade of Oracle Database. DBUA works for CDB and non-CDB database systems.
The following topics describe recommendations and procedures for upgrading a database using DBUA:
Note:
You can invoke DBUA in silent mode, which does not present a user interface, as described in "Using DBUA in Silent Mode to Upgrade Oracle Database". This is useful for large roll-outs and scripts.3.2.1 Recommendations for Using DBUA
The procedures for using DBUA are the same for a multitenant container database (CDB), pluggable databases (PDBs), and for a non-CDB. See Oracle Database Concepts for an overview and documentation roadmap for working with a CDB and PDBs. However, there are considerations and recommendations for running DBUA. This section summarizes the recommendations. Also see "About Stopping DBUA When Upgrading."
Recommendations for using DBUA are as follows:
-
Oracle strongly recommends that you run the Pre-Upgrade Information Tool before starting the upgrade with DBUA. Although DBUA runs the Pre-Upgrade Information Tool as part of the pre-requisite checks, it is good practice to run the tool ahead of time in order to analyze the database and take actions that can decrease downtime for upgrading. See "About the Pre-Upgrade Information Tool for Oracle Database" for information and steps.
-
Set Archive Log
ONduring upgrade. Oracle recommends that you set Archive LogONin order for DBUA to create and update the log file for the upgrade process. -
If the database instance is not running, then DBUA tries to start the instance. If the instance is up and running, then DBUA connects to it.
-
For Oracle RAC, if you upgrade a cluster database using DBUA, then you must leave the
CLUSTER_DATABASEinitialization parameter set toTRUE. -
If you restore your database manually (not using DBUA), then remove the
Welcome_SID.txtfile, which is located in theORACLE_HOME/cfgtoollogs/dbua/logs/directory, before starting DBUA. The presence of this file indicates to DBUA that this is a re-run operation. -
If Oracle Database Vault is enabled, then see "Requirement for Upgrading Oracle Databases That Use Oracle Database Vault".
3.2.1.1 About Stopping DBUA When Upgrading
If you stop the upgrade, but do not restore the database, then you cannot restart DBUA until you start the existing database in UPGRADE mode using the Oracle Database 12c server. You cannot go back to the original Oracle Database server unless you restore your database. Instead, you must continue with a manual (command line) upgrade as described in "Manually Upgrading a Multitenant Container Oracle Database (CDB)".
3.2.2 How DBUA Processes the Upgrade for Oracle Database
If you installed the software for Oracle Database 12c and specified that you are upgrading an existing Oracle database, then DBUA starts automatically. You can also start DBUA independently after the installation is complete as described in "Rerunning the Upgrade for Oracle Database".
While the upgrade is in process, DBUA shows the upgrade progress for each component. DBUA writes detailed trace and log files and produces a complete HTML report for later reference. To enhance security, DBUA automatically locks new user accounts in the upgraded database. DBUA then proceeds to create new configuration files (parameter and listener files) in the new Oracle home.
DBUA does not begin the upgrade process until all of the pre-upgrade steps are completed. Refer to "Tasks for Preparing to Upgrade Oracle Database", which provides a general overview and pointers to further information and procedures.
See Also:
"Upgrade Scripts Invoked by DBUA"3.2.2.1 Upgrade Scripts Invoked by DBUA
During the upgrade, DBUA automatically modifies or creates new required tablespaces and invokes the appropriate upgrade scripts.
During the prerequisite phase, DBUA runs the Pre-Upgrade Information Tool, preupgrd.sql, and uses the following logic to modify or create new required tablespaces:
-
If the datafiles are auto-extensible and have enough disk space to grow, then DBUA continues with the upgrade.
-
If the datafiles are not auto-extensible, then DBUA prompts you and makes the files auto-extensible.
-
If the tablespaces are auto-extensible and the
MAXSIZEinitialization parameter needs adjustment, then DBUA prompts for the same and adjusts theMAXSIZEparameter. -
If there is not enough disk space to grow, then DBUA prompts you to create space (by adding more datafiles). DBUA does not automatically add new datafiles because DBUA cannot determine where to create the files.
DBUA addresses many issues found during the prerequisite phase. For example, DBUA can ensure that the correct time zone file is used and make ACL adjustments for network access control lists.
During the upgrade phase, DBUA runs catctl.pl, which runs the upgrade processes in parallel instead of serially, optimally taking advantage of CPU capacity to decrease downtime as much as possible.
3.2.3 Using DBUA to Upgrade the Database on Linux, UNIX, and Windows Systems
The steps to upgrade a database using the DBUA graphical user interface are performed from within the new Oracle home where the Oracle Database 12c software has been installed. Only an Administrator should invoke DBUA for Windows systems (see "About Windows Authentication When Upgrading").
See Also:
-
"Installing the New Oracle Database Software" for more information about the software location
-
"Pre-Upgrade Information Tool Warnings and Recommendations for Oracle Database" for information about preparing for the upgrade to minimize down time
-
"Moving a Database from an Existing 12c Oracle Home" for the procedure to move an existing database
To upgrade a database using DBUA on Linux, UNIX, or Windows:
-
The
dbuaexecutable is located in the ORACLE_HOME/bin directory. Start DBUA from the Oracle home where the new database software has been installed:-
On Linux or UNIX platforms, enter the following command at a system prompt in the new home for Oracle Database 12c:
dbua
-
On Windows operating systems, select Start > Programs > Oracle-HOME_NAME > Configuration and Migration Tools > Database Upgrade Assistant.
The DBUA Select Operation page displays.
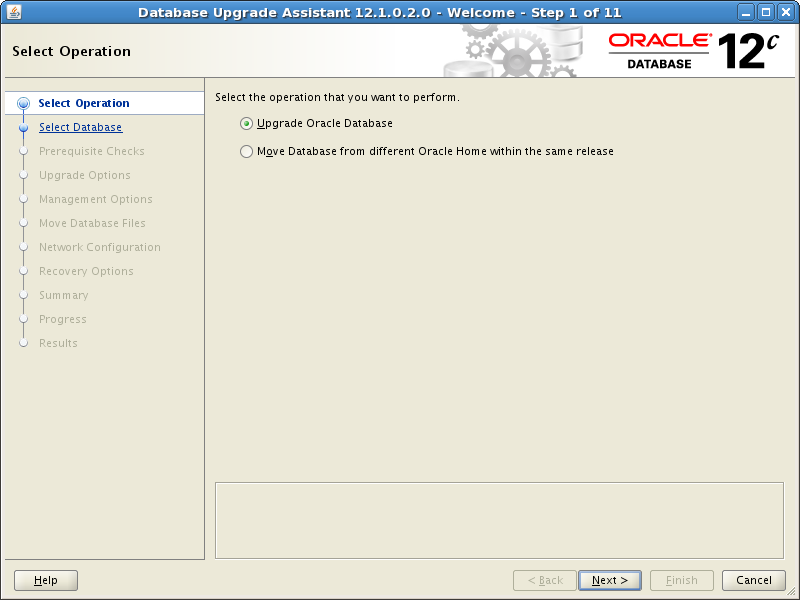
Description of the illustration dbua_1.png
-
-
If you need help at any DBUA page or want to consult more documentation about DBUA, then click Help to open the online help.
Click Next.
The Select Database page appears, listing the databases available for upgrade.
If the source database does not have operating system authentication, then DBUA prompts you for SYSDBA user name and password.
See Also:
"Moving a Database from an Existing 12c Oracle Home" for the procedure to move a database from an existing 12.1 Oracle home to a new 12.1 Oracle homeNote:
-
This may affect your authentication on Windows systems: Starting with Oracle Database 12c, Windows NTS authentication using the NTLM protocol is no longer supported for security reasons. Kerberos authentication is the only supported authentication. In this release, NTS does not work in Windows NT domains nor in domains with Windows NT controllers.
-
This may affect user accounts on Windows Systems: Starting with Oracle Database 12c, Oracle uses the standard Windows User Account instead of Local System Account to run Oracle database services. This separation of roles provides better security on Windows.
See Oracle Database Platform Guide for Microsoft Windows for information about managing user accounts on Windows systems.
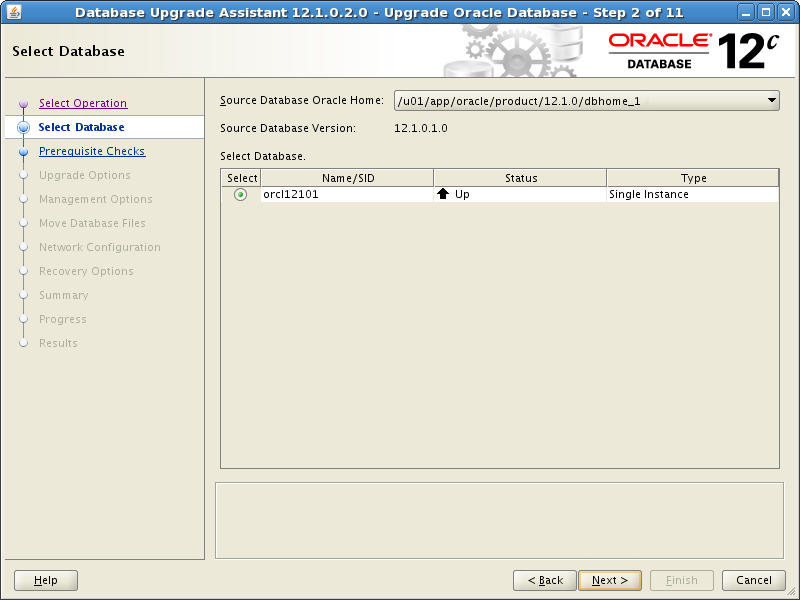
Description of the illustration dbua_2.png
-
-
From the Source Database Oracle Home drop-down list, choose the database you want to upgrade to Oracle Database 12c. DBUA fills in the information for the release and selects the Oracle database associated with the selected Oracle home.
You can select only one database at a time. If the database does not appear in the list, then make sure an entry with the database name exists in the
oratabfile in theetcdirectory.If you run DBUA from a user account that does not have
SYSDBAprivileges, then you must enter the user name and password credentials to enableSYSDBAprivileges for the selected database.Click Next.
If the selected database is a multitenant container database (CDB), then DBUA displays the Pluggable Databases page. The Pluggable Databases page lists the pluggable databases contained in the CDB, which will be upgraded along with the selected CDB.
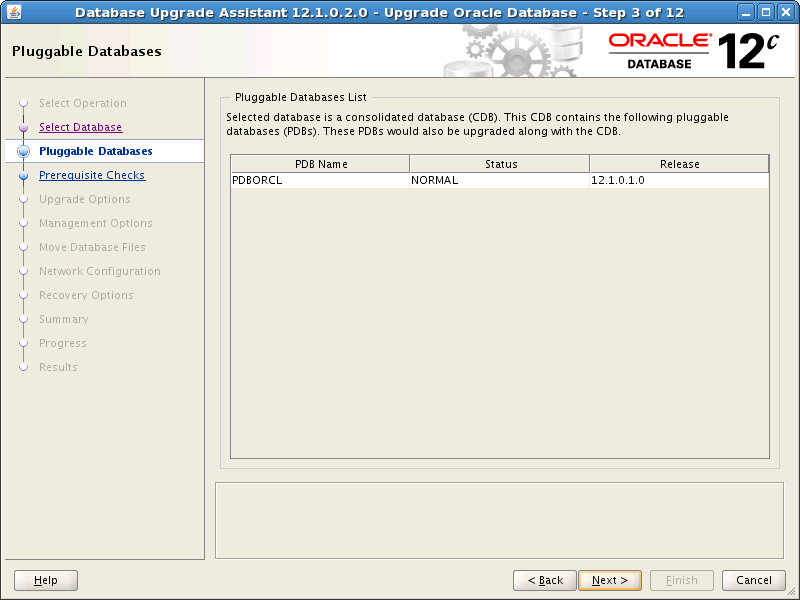
Description of the illustration dbua_pdb_2a.png
Click Next again.
DBUA analyzes the database, performing pre-upgrade checks and displaying warnings as necessary. Examples of DBUA database checks include:
-
Empty database recycle bin.
-
Invalid objects.
-
Deprecated and desupported initialization parameters.
-
Time zone data file version.
When DBUA finishes its analysis, the Prerequisite Checks page displays. The analysis takes several minutes to complete.
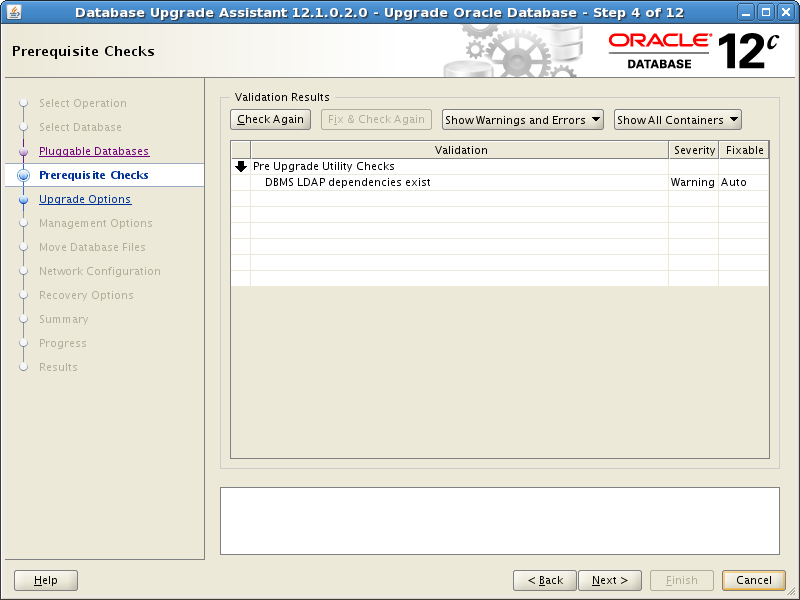
Description of the illustration dbua_3.png
-
-
The Prerequisite Checks page shows the validation and results, the severity, whether the result is fixable if there is a problem, and the action you can take. When you select the validation result, the Fixable column displays whether the result can be fixed or not. The Action drop-down list shows actions you can take. For example, select Fix for DBUA to run a script or command to fix the problem.
When you select a result in the Validation column, DBUA displays information about the result in the bottom area of the page.
-
Click the link for more details in the text information area. The Validation Details box appears with more information.
-
If there are validation errors or warnings and these are fixable, you can select an Action to take.
Click Next.
The Upgrade Options Configuration page appears with the Upgrade Options tab selected.
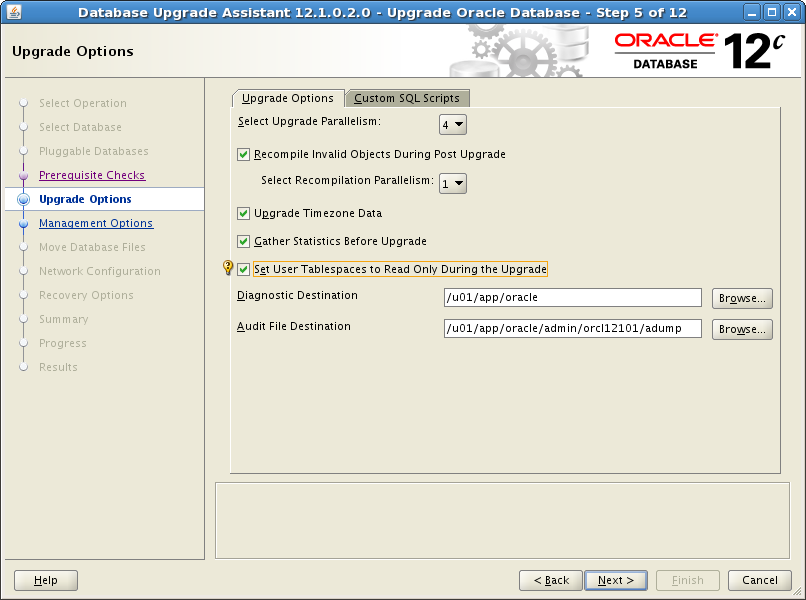
Description of the illustration dbua_4.png
-
-
The Upgrade Options page with the Upgrade Options tab selected provides the following options:
Select Upgrade Parallelism
The Upgrade Parallelism section enables the degree of parallelism for the upgrade process. This option reduces the time needed to perform the upgrade, based on the number of CPUs available to handle the running of scripts and processes simultaneously.
By default, DBUA sets Upgrade Parallelism to the number of CPUs or 2 if the number of CPUs is less than 4. You can adjust this default value by selecting a new value from the Degree of Parallelism drop-down list.
Recompile Invalid Objects During Post Upgrade
Recompile all invalid PL/SQL modules after the upgrade is complete. Specify the parallelism for the recompilation of invalid objects during post upgrade. DBUA provides a recommended degree of Recompilation Parallelism, which it sets to one less than the number of CPU you have available. Taking advantage of parallelism can significantly reduce the upgrade time. If you do not have DBUA recompile invalid objects in its post-upgrade phase, then you must manually recompile invalid objects after the database is upgraded.
Upgrade Time Zone Data
Update the time zone data file for this release. If you do not select this option, then you must update the time zone configuration file manually after the upgrade.
Gather Statistics Before Upgrade
Reduce the overall time for the upgrade process by gathering statistics before upgrading.
Set User Tablespaces to Read Only During the Upgrade
Uncheck if you are upgrading a database in which you must transport tablespaces. Transportable tablespaces must have writable file headers.
Diagnostic Destination
The location for output that DBUA creates for diagnostics. You can accept the default, enter a full path into the field, or click Browse to navigate to a location.
Audit File Destination
The location for DBUA to save audit files. Accept the default, or click Browse to navigate to a different location.
(Optional) Click the Custom SQL Scripts tab to specify custom SQL scripts that you would like to run before and after the upgrade.
The Custom Scripts page appears. You may click Next without using the Custom SQL Scripts option.
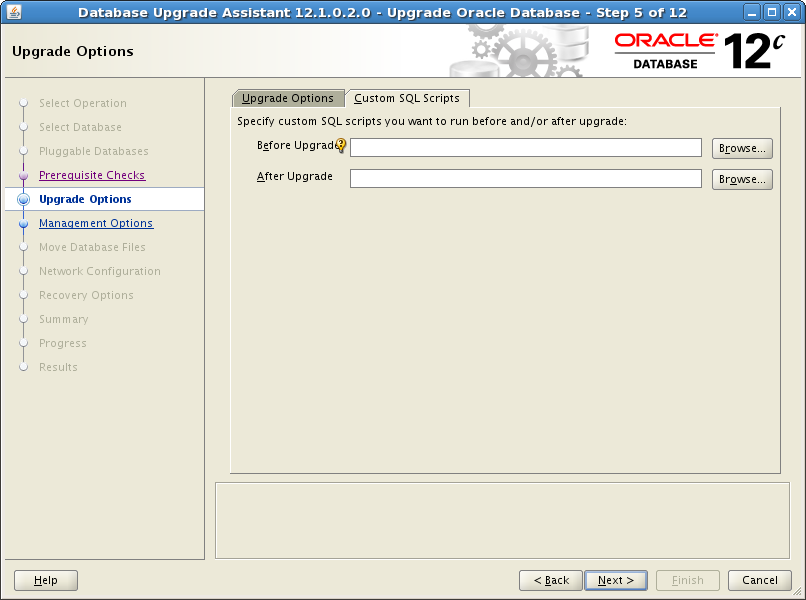
Description of the illustration dbua_4b.png
-
Optional: In the Before Upgrade and After Upgrade fields, browse to the location of any custom SQL scripts that you would like to run. You can specify either one or both, or leave the fields blank to skip this option.
Click Next.
The Management Options page appears.
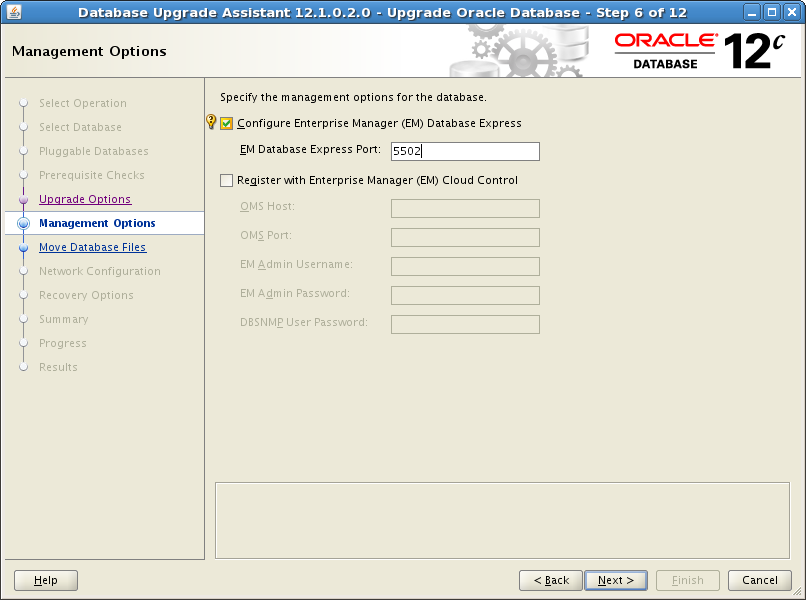
Description of the illustration dbua_mgt_options.png
-
In the Management Options page, select the management options:
-
Configure Enterprise Manager (EM) Database Express
Oracle Enterprise Manager Database Express is a web-based database management application that is built into Oracle Database 12c. EM Express replaces the DB Control component that was available in releases 10g and 11g. Enter the EM Database Express Port number, for example 5502.
-
Register with Enterprise Manager (EM) Cloud Control
Registering with Oracle Enterprise Manager Cloud Control adds the database and its related entities such as Listener, Oracle ASM disk groups, and Oracle Clusterware as managed targets.
If you select this option, then you must provide information in the following fields:
-
OMS Host
-
OMS Port
-
EM Admin Username
-
EM Admin Password
-
DBSNMP User Password
-
Click Next.
If you are upgrading a single-instance database or Oracle Express Edition (XE), then the Move Database Files page appears.
Note:
If you are upgrading an Oracle Real Application Clusters database, then the Move Database Files page does not display. To continue with your Oracle RAC upgrade, you can skip the steps pertaining to moving database files and configuring the network.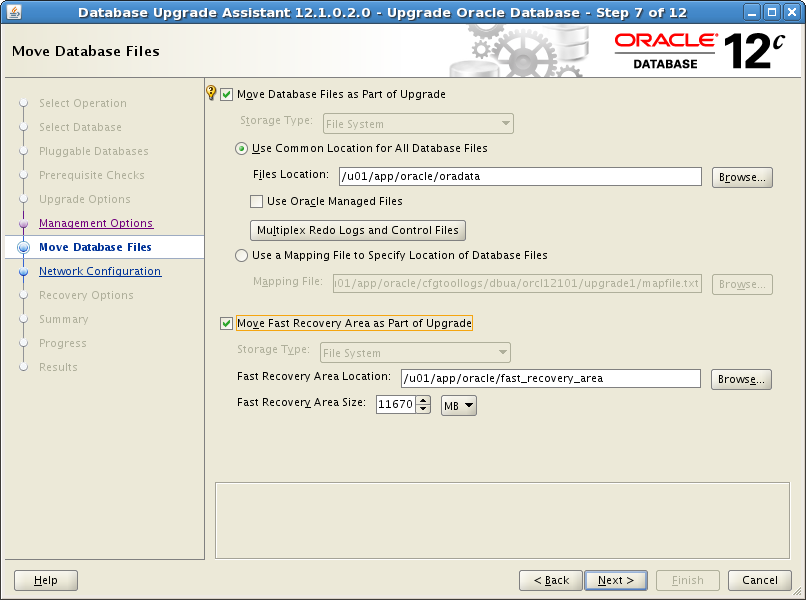
Description of the illustration dbua_5.png
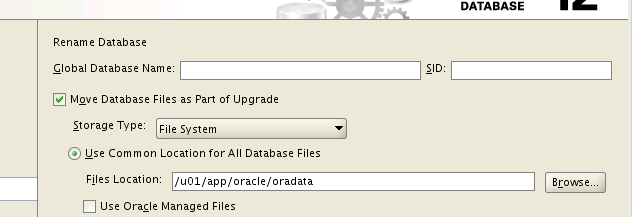
If you are upgrading an Oracle Express database (Oracle XE), then the Move Database Files screen additionally includes Rename Database with the Global Database Name and SID fields as follows:
Description of the illustration dbua_xe7.png
-
-
In the Move Database Files page, select an option:
-
Move Database Files as Part of Upgrade
-
Move Fast Recovery Area as Part of Upgrade
If you are upgrading an Oracle XE database, then you must provide the Global Database Name and SID. The rest of the Move Database Files options are the same as for Oracle Database.
Note:
The fast recovery area is an Oracle-managed disk location used for storing backup and recovery-related files. Oracle strongly recommends configuring a fast recovery area, because it significantly enhances speed, reliability, and manageability of the database recovery process. The location of the fast recovery area is also used by Oracle Enterprise Manager if you enable local management on the Management Options page. -
-
If you choose Move Database Files as Part of Upgrade, then you must also configure Storage Type for the database files.
In the Storage Type drop-down list, select File System or Oracle ASM.
-
If you select File System, then your database files are moved to the host file system.
-
If you select Oracle Automatic Storage Management (Oracle ASM), then your database files are moved to Oracle ASM storage, which must currently exist on your system. If you do not have an Oracle ASM instance, then you can create one using Automatic Storage Management Configuration Assistant (ASMCA) from the Oracle Grid Infrastructure home and then restart DBUA.
See Also:
-
Oracle Grid Infrastructure Installation Guide for information about installing and configuring Oracle ASM
-
Oracle Automatic Storage Management Administrator's Guide for information about managing Oracle ASM instances with ASMCA
-
-
You can choose either Use Common Location for All Database Files or Use a Mapping File to Specify Location of Database Files. Specify the location in the file location field or browse to the location.
-
If you choose Use Oracle Managed Files, then click Multiplex Redo Logs and Control Files. The Multiplex Redo Logs and Control Files dialog box appears with location fields. Enter locations for online redo logs and control files to be written. Use multiple locations spread across different disks to provide greater fault tolerance.
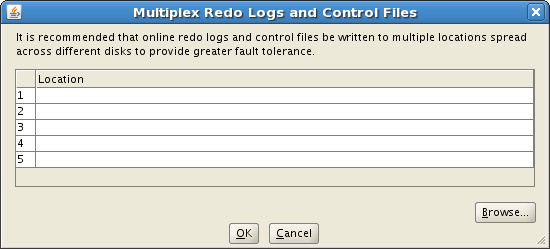
Description of the illustration dbua_multiplex_files.png
-
-
If you choose Move Fast Recovery Area as Part of Upgrade, then you must also configure the storage type and location for the fast recovery area and specify the size to be allocated as described in this step.
-
The Move Database Files and Move Fast Recovery Area options are independent of each other. For example, you can choose to move database files to Oracle ASM and leave the fast recovery area on the file system.
-
When you choose to move the fast recovery area, DBUA does not physically move existing archived redo logs to a new location. Instead, DBUA sets the
DB_RECOVERY_FILE_DESTandDB_RECOVERY_FILE_DEST_SIZEinitialization parameters to the new location and new size when the database is started from the new Oracle home. -
If an Oracle Express Edition database is being upgraded to Oracle Enterprise Edition, then you must configure a fast recovery area. If a fast recovery area is currently configured, then the current settings are retained but the page displays to enable you to override these values.
Storage Type
In the Storage Type list, select File System or Oracle ASM.
If you select File System, then your fast recovery area is on the host file system.
If you select Oracle Automatic Storage Management (Oracle ASM), then your fast recovery area is on Oracle ASM storage, which must currently exist on your system. If you do not have an Oracle ASM instance, then you can create one using Automatic Storage Management Configuration Assistant (ASMCA) from the Grid Infrastructure home and then restart DBUA.
Fast Recovery Area Location
Browse to the location on the host file system, or on Oracle ASM storage.
Fast Recovery Area Size
Specify the size to allocate for the fast recovery area. The default is 1024 MB.
Click Next.
The Network Configuration page appears for listener selection.
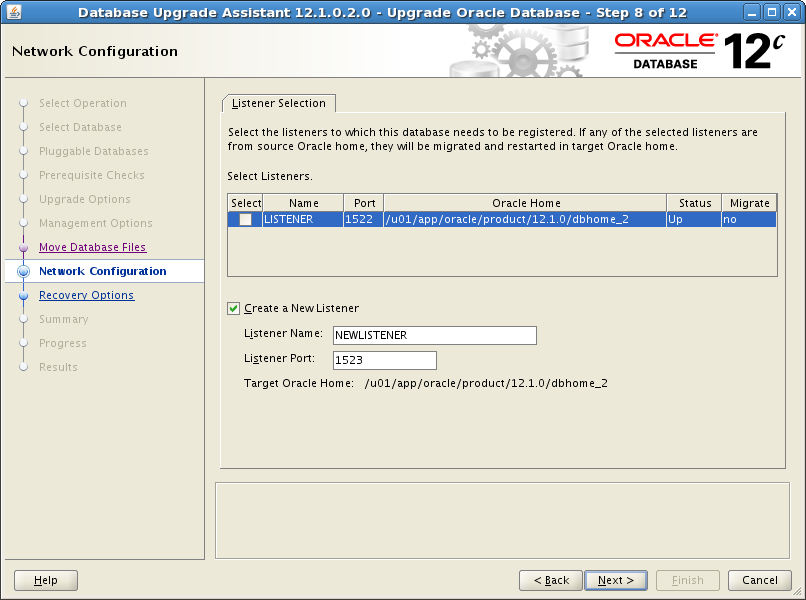
Description of the illustration dbua_6.png
-
-
The Listener Selection area of the Network Configuration page shows a table with: Name, Port, Oracle home, Status, and Migrate columns. To the left of the listener name is a box for selecting the listener.
Select one or more listeners from the source Oracle home to be migrated to the new upgraded Oracle home.
-
DBUA adds the selected listener to the
listener.orafile of the target Oracle home and starts it. -
DBUA removes the entry of the upgraded database from the old (source)
listener.orafile. -
DBUA reloads the
listener.orafile in both the source and target Oracle Database environments.
Note:
If there are other databases registered with the same listener, then their new client connection requests may be affected during listener migration.Select Create a New Listener to create a new listener. Provide the name and port number.
Click Next.
DBUA displays the Recovery Options page. DBUA performs the listener migration during the pre-upgrade steps.
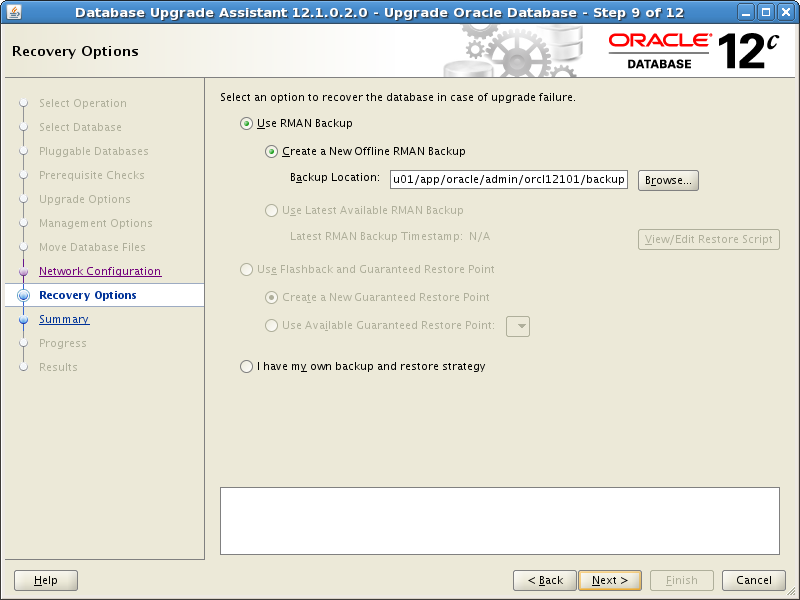
Description of the illustration dbua_7.png
-
-
In the Recovery Options page, select the recovery method to use in case the upgrade process encounters a problem.
The following recovery options and configurations are available:
-
Use RMAN Backup
-
Use Flashback and Guaranteed Restore Point
-
I have my own backup and restore strategy
Use RMAN Backup
If you select Create a New Offline RMAN Backup, then enter the full path for a location for the backup in the Backup Location field.
If you select Use Latest Available RMAN Backup but do not choose to create an RMAN backup before upgrading, then DBUA displays the time stamp for the latest RMAN backup that exists. You can click Restore Script next to the time stamp to select an existing script to run for restoring this backup.
Use Flashback and Guaranteed Restore Point
Select Create a New Guaranteed Restore Point to have DBUA create a restore point before DBUA enters the upgrade process.
If you previously enabled Flashback Database and configured a fast recovery area with a flashback retention target, then you can select Use Available Guaranteed Restore Point and pick the named SCN from the drop-down list. Your current settings for the restore point are retained. DBUA displays a page to permit you to override these values if needed.
I have my own backup and restore strategy
Select this option only if you used your own backup procedure to back up the database. In this case, Restore restores only the original database settings. To restore the database itself, you must restore the backup you created with your own backup utilities.
Note:
The database you are upgrading must be release 11.1.0.7 or later in order to take advantage of Flashback and Guaranteed Restore Point, and this must be enabled in the source database.See Also:
Oracle Database Backup and Recovery User's Guide for more information on using Flashback Database and guaranteed restore pointsClick Next.
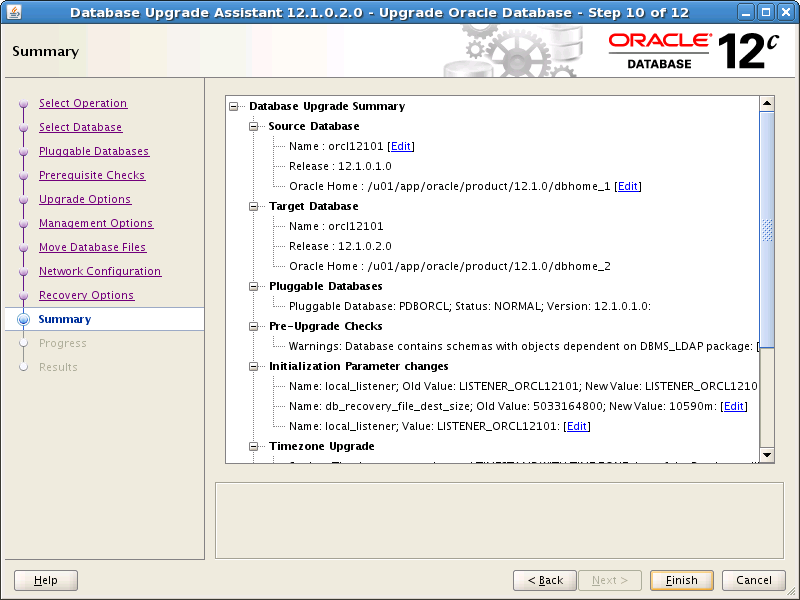
The Database Upgrade Summary page appears.
Description of the illustration dbua_8.png
-
-
The Summary page shows information about the upgrade before it starts. Scroll down the list to see all the details. For example:
-
Source Database
-
Target Database
-
Pluggable Databases
-
Pre-Upgrade Checks
-
Initialization Parameters changes
-
Timezone Upgrade
See Also:
"Setting the COMPATIBLE Initialization Parameter" for information about setting theCOMPATIBLEinitialization parameter after the upgradeCheck all of the details. Then click Back or Finish as follows:
-
Click Back if anything is incorrect until you reach the page where you can correct it.
-
Click Finish if everything is correct.
The Progress page displays with the progress bar and DBUA begins the upgrade. The Progress page also shows a table with the steps being performed, the time duration, and the status as the upgrade proceeds. DBUA provides a Stop button in case you must cancel the upgrade at this point.
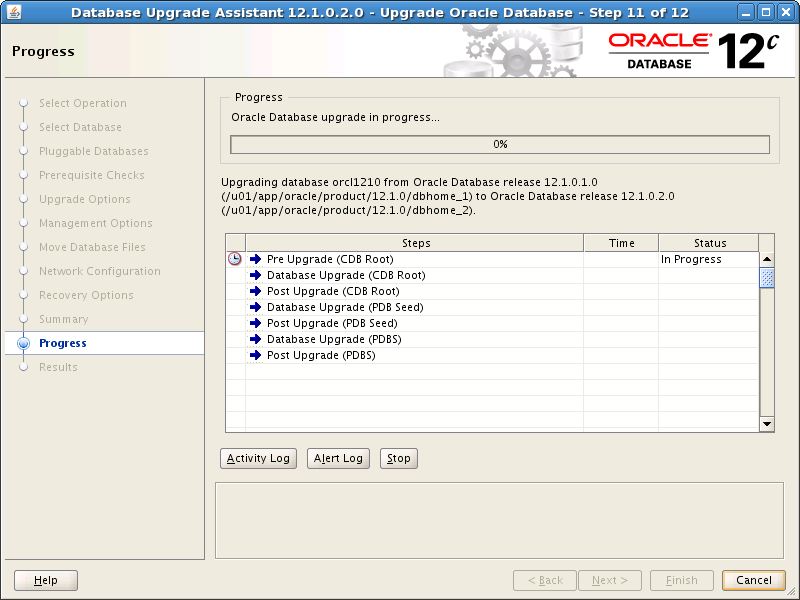
Description of the illustration dbua_9.png
When the upgrade has progressed through finishing the upgrade of the CDB root and each PDB seed, the Progress page marks the status Finished. You can click Activity Log, Alert Log, and Upgrade Results to view more information.
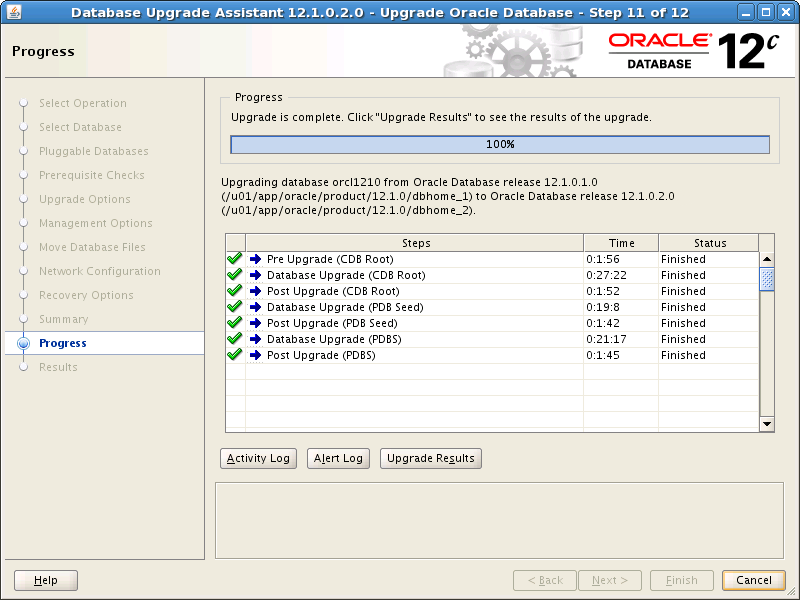
Description of the illustration dbua_9b.png
-
-
After the upgrade has completed, the Upgrade Results page displays a description of the original database and the upgraded database and shows the changes made to the initialization parameters. The page also shows the directory where various log files are stored after the upgrade, and pluggable databases. Scroll down to see more details about pre-upgrade checks.
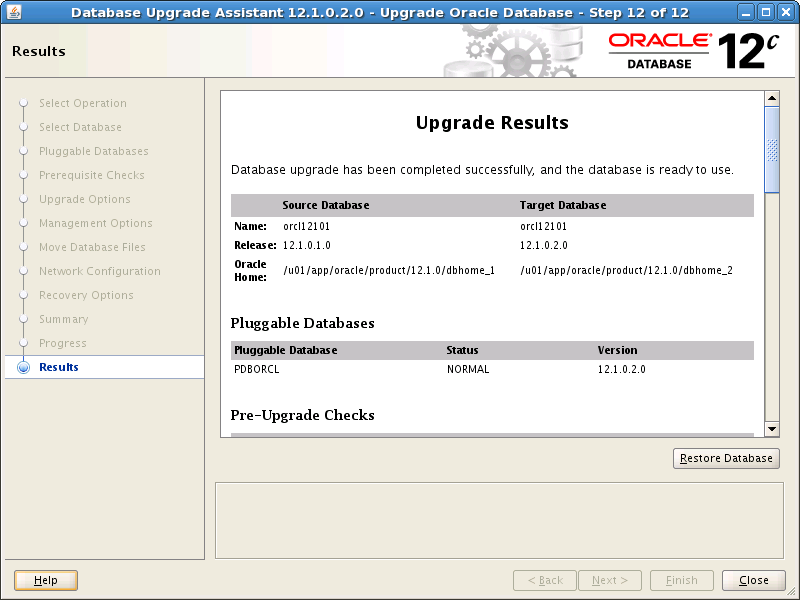
Description of the illustration dbua_10.png
-
Optional: Examine the log files to obtain more details about the upgrade process. The DBUA log files are located under /
ORACLE_BASE/cfgtoollogs/dbua/logs.Note:
An HTML version of the Upgrade Results is also saved in the log files directory. You can click the links in this HTML page to view the log pages in your browser.If you are satisfied with the upgrade results, then click Close to quit DBUA and use your newly upgraded database.
-
Complete the procedures described in Chapter 4, "Post-Upgrade Tasks for Oracle Database".
Note:
To prevent unauthorized use of the database, Oracle recommends that you change all user passwords immediately after you upgrade your database.If the default security settings for Oracle Database 12c are in place, then passwords must be at least eight characters, and passwords such as welcome and oracle are not allowed. See Oracle Database Security Guide for information about configuring authentication.
3.2.4 About Windows Authentication When Upgrading
On Windows systems, users who connect with the SYSDBA privilege can take advantage of Windows native authentication. If these users work with Oracle Database using their domain accounts, then you must explicitly grant them local administrative privileges and ORA_DBA membership.
Unlike earlier releases, it is not mandatory that the Oracle Database services run using the privileges of a Local System account. You can run Oracle Database services using the privileges of a Windows user account. To authenticate to the database, you can use the Oracle Database Windows-specific operating system groups.
See Also:
-
Oracle Database Security Guide for information on authenticating database administrators by using the operating system
-
Oracle Database Platform Guide for Microsoft Windows for information on authenticating database users with Windows
3.2.5 Moving a Database from an Existing 12c Oracle Home
With DBUA you can migrate an Oracle Database 12c database from an existing 12c Oracle home to another 12c Oracle home.
To move a database from an existing 12c home to a new 12c Oracle home:
-
Start DBUA as described in "Using DBUA to Upgrade the Database on Linux, UNIX, and Windows Systems".
DBUA starts with the The Select Operation page.
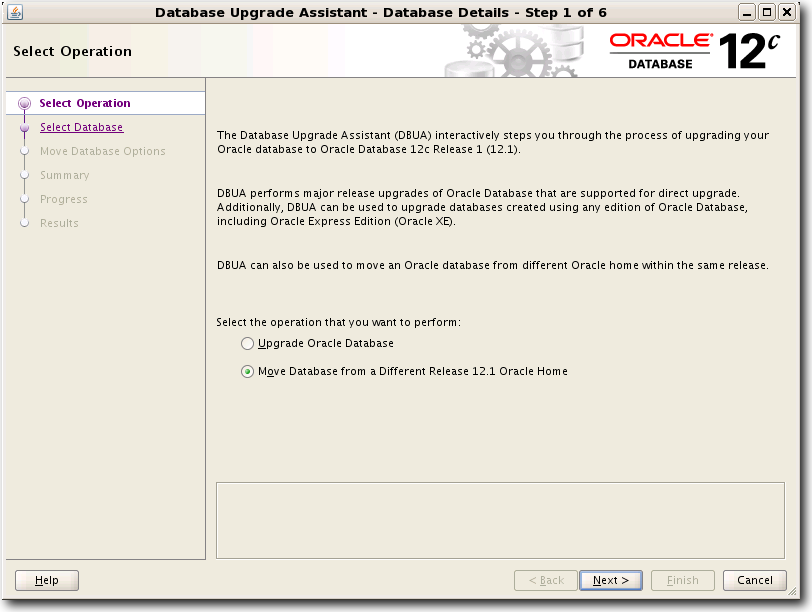
Description of the illustration dbua_movedb1.png
-
In the Select Operation page, choose Move Database from a Different Release 12.1 Oracle Home and click Next.
The Select Database page appears.
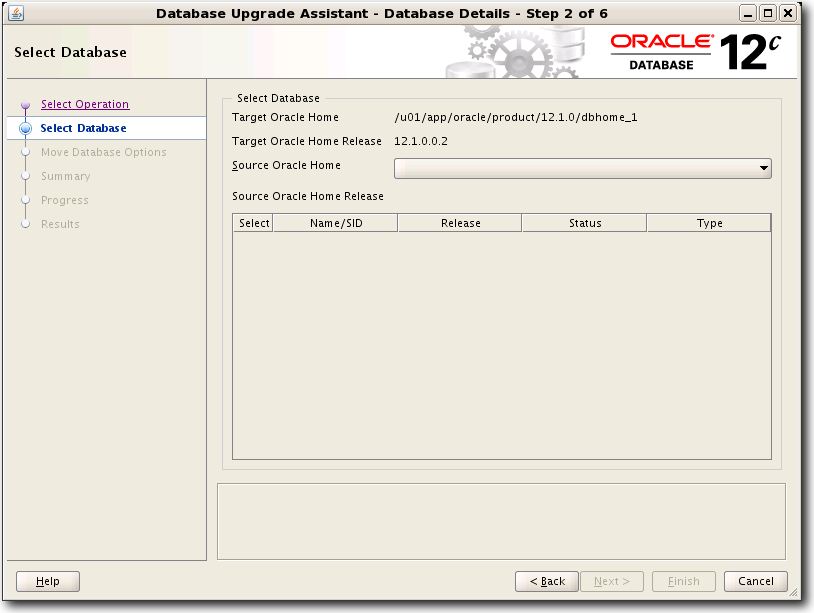
Description of the illustration dbua_movedb2.png
-
In the Select Database page, select the database you want to move to the new Oracle home. Only databases under a release 12c Oracle home appear. If you do not have an Oracle Database 12c database, then no database is available for the move operation.
Click Next. The Move Database Options page appears.
-
In the Move Database Options page, you can specify a different location for the diagnostic log files that DBUA creates, and you can optionally specify your custom SQL scripts, if any, to run after moving the database.
Click Next. The Database Move Summary page appears.
-
Review the summary for the move operation and click Next. The Progress page appears showing the processes for DBUA moving the database.
-
Click Finish when the move operation completes.
3.2.6 Using DBUA in Silent Mode to Upgrade Oracle Database
When invoked with the -silent command line option, DBUA operates in silent mode. In silent mode, DBUA does not present a user interface. DBUA writes messages (including information, errors, and warnings) to a log file in ORACLE_HOME/cfgtoollogs/dbua/SID/upgraden, where n represents the consecutive number for the upgrade that DBUA has run. Oracle strongly recommends that you read the resulting DBUA log files to ensure a successful upgrade.
To upgrade a database with DBUA in silent mode
-
Issue the following command
dbua -silent -sid ORCL &
where the database is named
ORCLin this example.
3.2.6.1 Oracle DBUA Command Line Options for Silent Mode
Database Upgrade Assistant (DBUA) supports command line options when run in silent mode. Table 3-1 describes the various options and the corresponding parameters that are supported by DBUA.
Note:
If the default Oracle Database security settings are in place, then passwords must be at least eight characters, and passwords such aswelcome and oracle are not allowed. See Oracle Database Security Guide for more information.Table 3-1 DBUA Command Line Options
| Option | Description |
|---|---|
|
|
Specifies that DBUA should operate in silent mode. |
|
|
Specifies the system identifier (SID) of the database to upgrade. |
|
|
Specifies the Oracle Database home directory of the database to upgrade. |
|
|
Specifies the Oracle Database base directory of the database to upgrade. |
|
|
To create a listener in the Oracle home of the new release, specify |
|
|
To register the database with existing listeners, pass listeners by comma separated |
|
|
Specifies the default location to store Oracle trace and diagnostic files. It replaces the initialization parameter settings for background dump destination and user dump destination from earlier releases. |
|
|
Specifies a user with |
|
|
Specifies the password for SYSDBA_user. |
|
|
Autoextends database files during the upgrade. Data files revert to their original autoextend settings after the upgrade. |
|
|
Specifies a new global database name. This option applies only if you are moving data files or upgrading an Oracle XE database. |
|
|
Specifies a new system identifier (SID) of the database to upgrade. This option applies only if you are moving data files or upgrading an Oracle XE database. |
|
|
Upgrades the time zone file version for the database. |
|
|
Applies only if you are moving data files or upgrading an Oracle XE database. If you specify this option, then DBUA only generates a database map file in the log location and then exits. |
|
|
Applies only if you are moving data files or upgrading an Oracle XE database. If the database to upgrade has an Oracle ASM instance, then this option tells DBUA to use it for the upgrade. |
|
|
Specifies a common location to store database files. This option applies only if you are moving data files or upgrading an Oracle XE database. |
|
|
Specifies a database area for Oracle Managed Files. This option applies only if you are moving data files or upgrading an Oracle XE database. |
|
|
Specifies the full name of the map file to map database files. This option applies only if you are moving data files or upgrading an Oracle XE database. |
|
|
Specifies the recovery area for a database that is moved during upgrade. This option applies only if you are moving data files or upgrading an Oracle XE database. |
|
|
Specifies the recovery area size (MB) for a database that is moved during upgrade. This option applies only if you are moving data files or upgrading an Oracle XE database. |
|
|
Specifies the password for the Application Express Administrator. |
|
|
Disables the detailed log generation for running SQL scripts during the upgrade process. This is enabled by default. To enable log generation, do not specify this option. |
|
|
Specifies a directory to back up your database before the upgrade starts. |
|
|
Specifies a comma-delimited list of SQL scripts. Specify complete path names. The scripts are executed after the upgrade. |
|
|
Specifies a comma-delimited list of initialization parameter values of the form name=value. |
|
|
Turns off archiving and flashback logging for the duration of the upgrade. |
|
|
When you specify |
|
|
Specifies the level to be used for parallel recompilation. |
|
|
Specifies the destination directory for all recovery files. This option applies only if you are moving data files, upgrading an Oracle XE database, or configuring Oracle Enterprise Manager. |
|
|
Specifies the local SID of the cluster database if the cluster database is not registered in the Oracle Cluster Registry. |
|
|
Displays help for DBUA. |
3.2.6.2 DBUA Command Line Syntax for Silent Mode
You can specify all valid options from the command line using the following syntax:
dbua [ -silent ] [ -sid SID ] [-oracleHome home_name] [-oracleBase base_name]
[-diagnosticDest diagnostic_destination]
[-sysDBAUserName SYSDBA_user] [-sysDBAPassword SYSDBA_pwd]
[-upgradeASM] [-autoextendFiles] [-newGlobalDbName db_name] [-newSid new_SID]
[-generateMapFile] [-useASM] [-commonFileLocation common_files]
[-omfLocation omf_area] [-databaseMapFile map_file_name]
[-newRecoveryArea recover_area] [-newRecoveryAreaSize recover_size]
[-apexAdminPassword apex_pwd] [-disableUpgradeScriptLogging ]
[-backupLocation directory]
[-sysauxTablespace -datafileName name -datafileSize size
  -datafileSizeNext size -datafileSizeMax size]
[-postUpgradeScripts script [, script ] ... ]
[-initParam parameter=value [, parameter=value ] ... ]
[-disableArchiveLogMode] [-recompile_invalid_objects true | false]
[-degree_of_parallelism number]
[-recoveryAreaDestination directory] [-h|-help]
3.3 About the Parallel Upgrade Utility for Oracle Database
Oracle Database 12c introduces the Parallel Upgrade Utility (catctl.pl), which enables components that do not have to be upgraded in a specific order to be upgraded at the same time, taking full advantage of CPU capacity. Oracle continues to make improvements to the upgrade process to simplify both manual upgrades and upgrades performed with the Database Upgrade Assistant (DBUA). DBUA and the manual upgrade procedures take advantage of the new Parallel Upgrade Utility. The Parallel Upgrade Utility reduces the total amount of time it takes to perform an upgrade by loading the database dictionary in parallel using multiple SQL processes to upgrade the database.
Related topics about the new Parallel Upgrade Utility (catctl.pl) are as follows:
3.3.1 General Steps for Running the New Parallel Upgrade Utility (catctl.pl)
The Parallel Upgrade Utility loads the data dictionary and components in parallel, thus reducing the overall upgrade time. Before invoking the Parallel Upgrade Utility, catctl.pl, follow the procedures for backing up your database that you would normally do before upgrading. Also, as a prerequisite, you must run the Pre-Upgrade Information Tool (preupgrd.sql) to identify any problems that a database administrator must address before the upgrade proceeds.
The detailed procedure for manually running catctl.pl is described in "Manually Upgrading a Multitenant Container Oracle Database (CDB)". The general steps for upgrading your database with the Parallel Upgrade Utility are as follows:
-
Back up your current database as described in "Backing Up Oracle Database for Upgrading".
-
Install the Oracle Database 12c software for the new release as described in "Installing the New Oracle Database Software".
-
Ensure the Pre-Upgrade Information Tool (
preupgrd.sql) has been run on the source database as described in "About the Pre-Upgrade Information Tool for Oracle Database". -
From the
ORACLE_HOME/rdbms/admindirectory, start SQL*Plus. -
Connect to the database to be upgraded using an account with DBA privileges:
CONNECT / AS SYSDBA
-
Start the database in upgrade mode.
For a multitenant container database (CDB):
SQL> alter pluggable database all open upgrade;
For a non-CDB:
SQL> startup upgrade
Note:
TheUPGRADEkeyword performs operations that prepare the environment for the upgrade.You might be required to use the
PFILEoption in your startup command to specify the location of your initialization parameter file. See Oracle Database Administrator's Guide for information about specifying initialization parameters at startup and the initialization parameter file.Once the database is started in upgrade mode, only queries on fixed views execute without errors until after the
catctl.plscript is run. Before runningcatctl.pl, queries on any other view or the use of PL/SQL returns an error.If errors appear listing desupported initialization parameters, then make a note of the desupported initialization parameters and continue with the upgrade. Remove the desupported initialization parameters the next time you shut down the database.
-
Exit SQL*Plus.
-
Run
catctl.plfrom the new Oracle home. See "Parallel Upgrade Utility (catctl.pl) Parameters" for the parameters available for runningcatctl.pl.To run
catctl.plon Linux:cd $ORACLE_HOME/rdbms/admin $ORACLE_HOME/perl/bin/perl catctl.pl catupgrd.sql -l
To run
catctl.plon Windows:cd %ORACLE_HOME%\rdbms\admin %ORACLE_HOME%\perl\bin\perl catctl.pl catupgrd.sql -l
3.3.2 Parallel Upgrade Utility (catctl.pl) Parameters
The parameters listed in Table 3-2 are available when invoking catctl.pl. See "Example for Using the Parallel Upgrade Utility" for more information on how catctl.pl processes the upgrade phases and for an example.
Table 3-2 catctl.pl Parameters
| Parameter | Description |
|---|---|
|
-c |
Specifies the PDBs that you want to upgrade. This parameter provides an inclusion list. For example, include the PDBs named here (skip all PDBs not named here): For Linux and UNIX (use single quotes): -c 'PDB1 PDB2' For Windows (use double quotes): -c "PDB1 PDB2" |
|
-C |
Specifies the PDBs that you do not want to upgrade. This parameter provides an exclusion list. For example, skip all PDBs named here (all other PDBs are upgraded): For Linux and UNIX (use single quotes): -C 'PDB1 PDB2' For Windows (use double quotes): -C "PDB1 PDB2" Note: |
|
-d |
Specifies the location of the directory containing the files to be processed. |
|
-e |
Sets echo OFF while running the scripts. The default is echo ON. |
|
-i |
Specifies an identifier to use when creating spool log files. |
|
-l |
Specifies the location for the directory to use for spool log files. The default is the current working directory. Oracle strongly recommends that you do not write log files to the |
|
-M |
Keeps CDB$ROOT in UPGRADE mode while the PDBs are upgraded.For non-CDBs, this parameter is ignored.During CDB upgrades, using this parameter setting places the CDB and all of its PDBs in upgrade mode, which may reduce total upgrade time. However, you cannot bring up any of the PDBs until the CDB and all of its PDBs are upgraded.By default, if you do not use the -M parameter setting, then CDB$ROOT is upgraded and restarted in normal mode, and the normal background processes are started. As each PDB is upgraded, you can bring the PDB online while other PDBs are still being upgraded. |
|
-n |
Specifies the number of processes to use for parallel operations. For non-CDBs, it specifies the number of SQL processors to use when upgrading the database. The maximum value is 8. The minimum value is 1. The default value is 4. For CDBs, multiple PDB upgrades are processed together. The number of PDBs upgraded concurrently is controlled by the value of the -n parameter. The default value is the number of CPUs divided by 2 (cpu_count/2). A cpu_count equal to 24 equates to 12 PDB upgrades running concurrently. The maximum value is 64. The minimum value is 4. The maximum PDB upgrades running concurrently is 32 (64/2), and the minimum value is 2 (4/2). |
|
-N |
Specifies the number of SQL processors to use when upgrading PDBs. For non-CDBs, this parameter is ignored. For CDBs, the maximum value is 8. The minimum value is 1. The default value is 2. |
|
-p |
Restarts the specified phase (skip successful phases on a rerun). |
|
-P |
Stop the specified phase. |
|
-s |
Names the SQL script to initialize sessions. |
|
-S |
Specify serial upgrade instead of parallel. |
|
-u |
Specifies username and prompts for password. |
|
-y |
Displays phases only. |
|
-z |
Turns on debug information for catcon.pm. |
|
-Z |
Turns on debug tracing information for For example, to set the number to 1, enter |
3.3.3 Example for Using the Parallel Upgrade Utility
The catctl.pl Parallel Upgrade Utility is integrated with DBUA. However, for manual, command line upgrades, you can run catctl.pl with various parameters. For example, to run catctl.pl in serial mode instead of using parallel operations, specify the -S parameter. See Table 3-2, "catctl.pl Parameters" for the available parameters.
Example 3-1 Running catctl.pl with select parameters
If -n 4 is used when invoking catctl.pl, then catupgrd0.log, catupgrd1.log, catupgrd2.log, and catupgrd3.log are created during the upgrade process. When evaluating if an upgrade succeeded or failed, all of the catupgrd#.log files must be checked. If catctl.pl is rerun, then the previous log files are overwritten unless you specify a different log directory.
cd $ORACLE_HOME/rdbms/admin
$ORACLE_HOME/perl/bin/perl catctl.pl -n 4 -l $ORACLE_HOME/diagnostics catupgrd.sql
3.4 Manually Upgrading a Non-CDB Oracle Database
After installing the software for Oracle Database 12c and preparing the new Oracle home, you can proceed with a manual, command-line upgrade rather than use DBUA.
The procedure in this section provides steps for upgrading an Oracle Database that is not a multitenant container database (CDB). This procedure assumes that you installed the software for Oracle Database 12c, that you prepared the new Oracle home, and that you have run the Pre-Upgrade Information Tool. Refer to "Installing the New Oracle Database Software" and "Preparing the New Oracle Home for Upgrading" for additional procedures.
See Also:
Oracle Database Concepts for an overview of multitenant architectureTo manually upgrade a non-CDB database:
-
If you have not done so, run the Pre-Upgrade Information Tool as described in "About the Pre-Upgrade Information Tool for Oracle Database". Review the Pre-Upgrade Information tool output and correct all issues noted in the output before proceeding. Refer to "Pre-Upgrade Information Tool Warnings and Recommendations for Oracle Database" for information about fixing any issues.
-
Back up the source database as described in "Backing Up Oracle Database for Upgrading".
-
If you have not done so, prepare the new Oracle home as described in "Preparing the New Oracle Home for Upgrading".
-
Shut down the database.
SQL> SHUTDOWN IMMEDIATE
-
If your operating system is Windows, then complete the following steps:
-
Stop the
OracleServiceSIDOracle service of the database you are upgrading, whereSIDis the instance name. For example, if yourSIDisORCL, then enter the following at a command prompt:C:\> NET STOP OracleServiceORCL
-
Delete the Oracle service at a command prompt using
ORADIM. Refer to "Variables for using ORADIM When Upgrading Oracle Database on Windows" for more information. Refer to your platform guide for a complete list of theORADIMsyntax and commands.If your
SIDisORCL, then enter the following command. Substitute the actual name for yourSID.C:\> ORADIM -DELETE -SID ORCL
-
Create the service for Oracle Database 12c at a command prompt using the
ORADIMcommand of the new Oracle Database release as shown in the following example:C:\> ORADIM -NEW -SID SID -SYSPWD PASSWORD -MAXUSERS USERS -STARTMODE AUTO -PFILE ORACLE_HOME\DATABASE\INITSID.ORA
Most Oracle Database services log on to the system using the privileges of the Oracle Home User. The service runs with the privileges of this user. The
ORADIMcommand prompts you for the password to this user account. You can specify other options usingORADIM.In this example, if your
SIDisORCL, yourpassword(SYSPWD) isTWxy5791, the maximum number of users (MAXUSERS) is 10, and the ORACLE_HOME directory isC:\ORACLE\PRODUCT\11.2.0\DB, then enter the following command:C:\> ORADIM -NEW -SID ORCL -SYSPWD TWxy5791 -MAXUSERS 10 -STARTMODE AUTO -PFILE C:\ORACLE\PRODUCT\11.2.0\DB\DATABASE\INITORCL.ORA
ORADIMwrites a log file to theORACLE_HOME\databasedirectory. The log file contains the name of the PDB in the multitenant database.
-
-
If your operating system is Linux or UNIX, then perform the following checks:
-
Your
ORACLE_SIDis set correctly -
The
oratabfile points to the Oracle home for Oracle Database 12c -
The following environment variables point to the Oracle Database 12c directories:
-
ORACLE_HOME -
PATH
-
-
Any scripts that clients use to set the ORACLE_HOME value must point to the new Oracle home.
Note:
If you are upgrading a cluster database, then perform these checks on all nodes on which this cluster database has instances configured.See Also:
Oracle Database Installation Guide for operating system-specific information about setting other important environment variables on your operating system -
-
Log in to the system as the owner of the Oracle home under the new Oracle Database 12c.
-
From the
ORACLE_HOME/rdbms/admindirectory, start SQL*Plus. -
Connect to the database to be upgraded using an account with DBA privileges:
SQL> CONNECT / AS SYSDBA
-
Start the instance by issuing the following command in SQL*Plus:
SQL> startup upgrade pfile=pfile_nameNote:
TheUPGRADEkeyword enables you to open a database based on an earlier Oracle Database release. It also restricts logons toAS SYSDBAsessions, disables system triggers, and performs additional operations that prepare the environment for the upgrade.Specify the location of your initialization parameter file
PFILE. See Oracle Database Administrator's Guide for information about specifying initialization parameters at startup and the initialization parameter file.If errors appear listing desupported initialization parameters, then make a note of the desupported initialization parameters and continue with the upgrade. Remove the desupported initialization parameters the next time you shut down the database.
-
Exit SQL*Plus before proceeding to the next step.
-
Run the
catctl.plscript from the new Oracle home as described in this step. The Parallel Upgrade Utility,catctl.pl, provides parallel upgrade options that reduce downtime.To run
catctl.plon Linux:cd $ORACLE_HOME/rdbms/admin $ORACLE_HOME/perl/bin/perl catctl.pl catupgrd.sql
To run
catctl.plon Windows:cd %ORACLE_HOME%\rdbms\admin %ORACLE_HOME%\perl\bin\perl catctl.pl catupgrd.sql
Note:
-
You can use the -d option to specify the directory that contains the files to be processed, and -l to specify the directory to use for spool log files. You can use
catctl.pl -Sto run the upgrade processes serially. Refer to Table 3-2, "catctl.pl Parameters" for all the options. -
If you choose to run the
catupgrd.sqlscript on a non-CDB, then doing so now requires an additional input parameter as follows:SQL> @catupgrd.sql PARALLEL=NO
See Also:
"General Steps for Running the New Parallel Upgrade Utility (catctl.pl)" for information aboutcatctl.plparameters and options -
-
The upgraded database is shut down after running
catctl.pl. Restart the instance to reinitialize the system parameters for normal operation.SQL> STARTUP
This restart, following the database shutdown performed as part of the
catctl.plscript, flushes all caches, clears buffers, and performs other housekeeping activities. These measures are an important final step to ensure the integrity and consistency of the newly upgraded Oracle Database software.Note:
If you encountered a message listing desupported initialization parameters when you started the database in Step 11, then remove the desupported initialization parameters from the parameter file before restarting. If necessary, convert theSPFILEto aPFILEso you can edit the file to delete parameters. See Oracle Database Administrator's Guide for information about specifying initialization parameters at startup and the initialization parameter file. -
Important: The
catuppst.sqlscript is run as part of the upgrade unless the upgrade returns errors during the process. Check the log file for "Rem BEGIN catuppst.sql" to verify thatcatuppst.sqlran during the upgrade process.If
catuppst.sqlhas not run, then proceed to runcatuppst.sqlas shown in this step. Warning messages are also displayed when runningcatctl.plindicating thatcatuppst.sqlwas not run during the upgrade.Run
catuppst.sqlas follows:$ORACLE_HOME/perl/bin/perl catcon.pl -n 1 -e -b catuppst -d '''.''' catuppst.sql
The log file
catuppst0.logwill be generated with the results of the post upgrade. -
Run
catcon.plto invokeutlrp.sqlto recompile any remaining stored PL/SQL and Java code. Use the following syntax:$ORACLE_HOME/perl/bin/perl catcon.pl -n 1 -e -b utlrp -d '''.''' utlrp.sql
The log file
utlrp0.logis generated with the results of the recompilations. -
Run
postupgrade_fixups.sql. See "Run the postupgrade_fixups.sql Script." -
Run
utlu121s.sqlto verify that all issues have been fixed.SQL> @rdbms/admin/utlu121s.sql
The log file
utlu121s0.logwill be generated with the upgrade results.To see information about the state of the database, you can run
utlu121s.sqlas many times as you want, any time after completing the upgrade. If theutlu121s.sqlscript returns errors or shows components that are notVALIDor not the most recent release, then see "Troubleshooting the Upgrade for Oracle Database" for more information. -
Verify that all expected packages and classes are valid. (This step assumes that you previously ran
preupgrd.sqlbefore starting the upgrade.)$ORACLE_HOME/perl/bin/perl catcon.pl -n 1 -e -b utluiobj -d '''.''' utluiobj.sql
The log file
utluiobj0.logwill be generated with the results of the verification.Note:
If the Pre-upgrade Information Tool detectedINVALIDobjects and populated theregistry$sys_inv_objsandregistry$nonsys_inv_objstables, then executeORACLE_HOME/rdbms/admin/utluiobj.sqlto display only those objects which are newly invalid because of the upgrade process. Theutluiobj.sqlscript only displays objects that are nowINVALIDbut which wereVALIDbefore the upgrade. See "Using the Pre-Upgrade Information Tool (preupgrd.sql).". -
Exit SQL*Plus if you are still in it.
-
If you are upgrading a cluster database from releases 10.2, 11.1, or 11.2, then upgrade the database configuration in Oracle Clusterware using the following command:
$ srvctl upgrade database -d db-unique-name -o oraclehome
where
db-unique-nameis the database name assigned to it (not the instance name), andoraclehomeis the Oracle home location in which the database is being upgraded. TheSRVCTLutility supports long GNU-style options in addition to short CLI options used in earlier releases.
Your database is now upgraded to Oracle Database 12c. You are ready to complete the procedures described in Chapter 4, "Post-Upgrade Tasks for Oracle Database".
Note:
Oracle Warehouse Builder (OWB) components are not upgraded as part of the Oracle Database upgrade process. Oracle Warehouse Builder is not installed as part of Oracle Database 12c. See "Requirement for Upgrading Databases that Use Oracle Warehouse Builder (OWB)" for more information.Caution:
If you retain the old Oracle software, then never start the upgraded database with the old software. Only start the database with the executables in the new Oracle Database installation. Also, before you remove the old Oracle environment, make sure you relocate any data files in that environment to the new Oracle Database environment. See the Oracle Database Administrator's Guide for information about relocating data files.
3.4.1 Variables for using ORADIM When Upgrading Oracle Database on Windows
On Windows platforms, ORADIM provides a command-line interface to manually perform administrative tasks for Windows databases and services. Database Configuration Assistant (DBCA) provides a graphical user interface to perform the same tasks. The variables for ORADIM that you must know about when upgrading Oracle Database include the SID of the database you are upgrading, the new Oracle home location, and the password for the new database instance. Also, ORADIM writes a log file to the ORACLE_HOME\database directory.
The following table describes the variables for using ORADIM when upgrading:
| ORADIM Variable | Description |
|---|---|
SID |
The same SID name as the SID of the database you are upgrading. |
PASSWORD |
The password for the new Oracle Database 12c database instance. This is the password for the user connected with SYSDBA privileges. The -SYSPWD option is required.
The default Oracle Database 12c security settings require that passwords must be at least eight characters, and passwords such as |
USERS |
The maximum number of users who can be granted SYSDBA and SYSOPER privileges. |
ORACLE_HOME |
The Oracle home location for Oracle Database 12c. Ensure that you specify the full path name with the -PFILE option, including the drive letter of the Oracle home location. See Oracle Database Administrator's Guide for information about specifying initialization parameters at startup and the initialization parameter file. |
See Also:
Oracle Database Platform Guide for Microsoft Windows for complete information about using ORADIM to administer a database instance3.5 Manually Upgrading a Multitenant Container Oracle Database (CDB)
Oracle Database 12c introduces multitenant architecture, which enables an Oracle database to function as a multitenant container database (CDB) with pluggable databases. You can upgrade the CDB, thereby upgrading all the pluggable databases in the CDB at the same time. After installing the software for Oracle Database 12c and preparing the new Oracle home, you can proceed with a manual, command-line upgrade rather than use DBUA.
The procedure in this section provides steps for upgrading a CDB. This procedure assumes that you installed the software for Oracle Database 12c, that you prepared the new Oracle home, and that you have run the Pre-Upgrade Information Tool. Refer to "Installing the New Oracle Database Software" and "Preparing the New Oracle Home for Upgrading" for additional procedures.
To manually upgrade a CDB database:
-
If you have not done so, run the Pre-Upgrade Information Tool as described in "About the Pre-Upgrade Information Tool for Oracle Database". Review the Pre-Upgrade Information tool output and correct all issues noted in the output before proceeding. Refer to "Pre-Upgrade Information Tool Warnings and Recommendations for Oracle Database" for information about fixing any issues.
-
Back up the source database as described in "Backing Up Oracle Database for Upgrading".
-
If you have not done so, prepare the new Oracle home as described in "Preparing the New Oracle Home for Upgrading".
-
Shut down the database. (The syntax is the same for a non-CDB and a CDB.)
SQL> SHUTDOWN IMMEDIATE
Note:
To close a PDB, you can specify it from the CDB root:alter pluggable databasePDBnameclose. -
If your operating system is Windows, then complete the following steps:
-
Stop the
OracleServiceSIDOracle service of the database you are upgrading, whereSIDis the instance name. For example, if yourSIDisORCL, then enter the following at a command prompt:C:\> NET STOP OracleServiceORCL
-
Delete the Oracle service at a command prompt using
ORADIM. Refer to "Variables for using ORADIM When Upgrading Oracle Database on Windows" for more information. Also refer to your platform guide for a list theORADIMsyntax and commands.If your
SIDisORCL, then enter the following command. Substitute the actual name for yourSID.C:\> ORADIM -DELETE -SID ORCL
-
Create the service for Oracle Database 12c at a command prompt using the
ORADIMcommand of the new Oracle Database release as shown in the following example:C:\> ORADIM -NEW -SID SID -SYSPWD PASSWORD -MAXUSERS USERS -STARTMODE AUTO -PFILE ORACLE_HOME\DATABASE\INITSID.ORA
Most Oracle Database services log on to the system using the privileges of the Oracle Home User. The service runs with the privileges of this user. The
ORADIMcommand prompts you for the password to this user account. You can specify other options usingORADIM.In this example, if your
SIDisORCL, yourpassword(SYSPWD) isTWxy5791, the maximum number of users (MAXUSERS) is 10, and the ORACLE_HOME directory isC:\ORACLE\PRODUCT\11.2.0\DB, then enter the following command:C:\> ORADIM -NEW -SID ORCL -SYSPWD TWxy5791 -MAXUSERS 10 -STARTMODE AUTO -PFILE C:\ORACLE\PRODUCT\11.2.0\DB\DATABASE\INITORCL.ORA
ORADIMwrites a log file to theORACLE_HOME\databasedirectory. The log file contains the name of the PDB in the multitenant database.
-
-
If your operating system is Linux or UNIX, then perform the following checks:
-
Your
ORACLE_SIDis set correctly -
The
oratabfile points to the Oracle home for Oracle Database 12c -
The following environment variables point to the Oracle Database 12c directories:
-
ORACLE_HOME -
PATH
-
-
Any scripts that clients use to set the ORACLE_HOME value must point to the new Oracle home.
Note:
If you are upgrading a cluster database, then perform these checks on all nodes on which this cluster database has instances configured.See Also:
Oracle Database Installation Guide for operating system-specific information about setting other important environment variables on your operating system -
-
Log in to the system as the owner of the Oracle home under the new Oracle Database 12c.
-
From the
ORACLE_HOME/rdbms/admindirectory, start SQL*Plus. -
Connect to the database to be upgraded using an account with DBA privileges:
SQL> CONNECT / AS SYSDBA
-
Start the CDB in upgrade mode:
SQL> startup upgrade
-
Start the instance by issuing the following command in SQL*Plus:
SQL> alter pluggable database all open upgrade;
Note:
TheUPGRADEkeyword enables you to open a database based on an earlier Oracle Database release. It also restricts logons toAS SYSDBAsessions, disables system triggers, and performs additional operations that prepare the environment for the upgrade.Specify the location of your initialization parameter file
PFILE. See Oracle Database Administrator's Guide for information about specifying initialization parameters at startup and the initialization parameter file.If errors appear listing desupported initialization parameters, then make a note of the desupported initialization parameters and continue with the upgrade. Remove the desupported initialization parameters the next time you shut down the database.
-
Exit SQL*Plus before proceeding to the next step.
-
To upgrade an entire CDB, Run the
catctl.plscript from the new Oracle home as described in this step. The Parallel Upgrade Utility,catctl.pl, provides parallel upgrade options that reduce downtime.To run
catctl.plon Linux:cd $ORACLE_HOME/rdbms/admin $ORACLE_HOME/perl/bin/perl catctl.pl catupgrd.sql
To run
catctl.plon Windows:cd %ORACLE_HOME%\rdbms\admin %ORACLE_HOME%\perl\bin\perl catctl.pl catupgrd.sql
Note:
-
You can use the -d option to specify the directory that contains the files to be processed, and -l to specify the directory to use for spool log files. You can use
catctl.pl -Sto run the upgrade processes serially. Refer to Table 3-2, "catctl.pl Parameters" for all the options. -
If you choose to run the
catupgrd.sqlscript on a non-CDB, doing so now requires an additional input parameter as follows:SQL> @catupgrd.sql PARALLEL=NO
-
When upgrading an entire CDB, upgrade aborts if there are errors in the CDB root or PDB seed.
-
To run
catupgrd.sqlon a CDB, you must run it in the CDB$ROOT and PDB$SEED for all the PDBs. For example:SQL> ALTER SESSION SET CONTAINER = "CDB$ROOT" SQL> catupgrd.sql PARALLEL=NO SQL> ALTER SESSION SET CONTAINER = "PDB$SEED" SQL> catupgrd.sql PARALLEL=NO SQL> ALTER SESSION SET CONTAINER = "PDB1" SQL> catupgrd.sql PARALLEL=NO
See Also:
"General Steps for Running the New Parallel Upgrade Utility (catctl.pl)" for information aboutcatctl.plparameters and options -
-
To upgrade a subset of PDBs within a CDB, you can specify either an inclusion list or an exclusion list as shown in the examples in this step.
-
Inclusion list to upgrade PDB1 only:
cd $ORACLE_HOME/rdbms/admin
$ORACLE_HOME/perl/bin/perl catctl.pl -c 'PDB1' catupgrd.sql
-
Exclusion list to upgrade everything in the CDB except PDB1:
cd $ORACLE_HOME/rdbms/admin
$ORACLE_HOME/perl/bin/perl catctl.pl -C 'PDB1' catupgrd.sql
Note:
You can also upgrade a specific PDB by itself by unplugging it and then plugging it back into the CDB. This is described in "Upgrading a Pluggable Database (PDB)."For Windows, the -C option must be specified with quotes around the CDB root name and PDB seed name, for example:
...
-C "CDB$ROOT PDB$SEED" -
-
Important: The
catuppst.sqlscript is run as part of the upgrade process unless the upgrade returns errors during the process. Check the log file for "Started: catuppst.sql" to verify thatcatuppst.sqlran during the upgrade process. Ifcatuppst.sqlhas not run, then proceed to runcatuppst.sqlas shown in this step. Warning messages are also displayed when runningcatctl.plindicating thatcatuppst.sqlwas not run during the upgrade.Run
catuppst.sqlas follows:$ORACLE_HOME/perl/bin/perl catcon.pl -n 1 -e -b catuppst -d '''.''' catuppst.sql
The log file
catuppst0.logwill be generated with the results of the post upgrade. -
Run
catcon.plto invokeutlrp.sqlto recompile any remaining stored PL/SQL and Java code. Use the following syntax:$ORACLE_HOME/perl/bin/perl catcon.pl -n 1 -e -b utlrp -d '''.''' utlrp.sql
The log file
utlrp0.logis generated with the results of the recompilations. -
Run
utlu121s.sqlto verify that all issues have been fixed.In a CDB:
$ORACLE_HOME/perl/bin/perl catcon.pl -n 1 -e -b utlu121s -d '''.''' utlu121s.sql
In a non-CDB:
SQL> @rdbms/admin/utlu121s.sql
The log file
utlu121s0.logwill be generated with the upgrade results.To see information about the state of the database, you can run
utlu121s.sqlas many times as you want, any time after completing the upgrade. If theutlu121s.sqlscript returns errors or shows components that are notVALIDor not the most recent release, then see "Troubleshooting the Upgrade for Oracle Database" for more information. -
Verify that all expected packages and classes are valid. (This step assumes that you previously ran
preupgrd.sqlbefore starting the upgrade.)$ORACLE_HOME/perl/bin/perl catcon.pl -n 1 -e -b utluiobj -d '''.''' utluiobj.sql
The log file
utluiobj0.logwill be generated with the results of the verification.Note:
If the Pre-upgrade Information Tool detectedINVALIDobjects and populated theregistry$sys_inv_objsandregistry$nonsys_inv_objstables, then executeORACLE_HOME/rdbms/admin/utluiobj.sqlto display only those objects which are newly invalid because of the upgrade process. Theutluiobj.sqlscript only displays objects that are nowINVALIDbut which wereVALIDbefore the upgrade. See "Using the Pre-Upgrade Information Tool (preupgrd.sql).". -
At this time you may ensure that the time zone data files are current. See "Upgrade the Time Zone File Version After Upgrading Oracle Database." You can also make this adjustment after the upgrade.
-
Exit SQL*Plus if you are still in it, for example, in a non-CDB.
-
If you are upgrading a cluster database from releases 10.2, 11.1, or 11.2, then upgrade the database configuration in Oracle Clusterware using the following command:
$ srvctl upgrade database -d db-unique-name -o oraclehome
where
db-unique-nameis the database name assigned to it (not the instance name), andoraclehomeis the Oracle home location in which the database is being upgraded. TheSRVCTLutility supports long GNU-style options in addition to short CLI options used in earlier releases.
Your database is now upgraded to Oracle Database 12c. You are ready to complete the procedures described in Chapter 4, "Post-Upgrade Tasks for Oracle Database".
Note:
Oracle Warehouse Builder (OWB) components are not upgraded as part of the Oracle Database upgrade process. Oracle Warehouse Builder is not installed as part of Oracle Database 12c. See "Requirement for Upgrading Databases that Use Oracle Warehouse Builder (OWB)" for more information.Caution:
If you retain the old Oracle software, then never start the upgraded database with the old software. Only start the database with the executables in the new Oracle Database installation. Also, before you remove the old Oracle environment, make sure you relocate any data files in that environment to the new Oracle Database environment. See the Oracle Database Administrator's Guide for information about relocating data files.
3.6 How the Data Dictionary is Upgraded and Status is Displayed
In Oracle Database 12c, improvements have been made to the upgrade process and how upgrade status appears for the upgraded database.
The following topics discuss changes that affect performance and status for data dictionary objects:
3.6.1 Parallel Upgrading of Data Dictionary
Upgrading the data dictionary in Oracle Database is now done in parallel with the catctl.pl utility, which speeds up the upgrade process. Instead of one SQL process loading the data dictionary, there can now be multiple processes, depending on CPU capacity. The catctl.pl utility loads data into the dictionary as fast as possible and defers any work that can be done in normal mode instead of upgrade mode. Upgrading the database in this fashion reduces the overall downtime.
3.6.2 Change to Upgrade Status Setting
When the upgrade is complete and if there are no errors, then the status of the database is set to UPGRADED. This behavior differs from earlier releases where the status of the database was set to VALID after upgrading. The UPGRADED status indicates that the data dictionary has been loaded without any errors. If any errors are logged to registry$error, then the status of the upgrade is set to INVALID.
3.6.3 Change to Status After Running the Re-compilation utlrp.sql Script
In earlier releases of Oracle Database after upgrading a database, VALID meant that all objects in the data dictionary have been recompiled and are ready for use. In Oracle Database 12c, obtaining a VALID status differs. Running the utlrp.sql script in normal mode, recompiles data dictionary objects and moves the data dictionary from an UPGRADED status to a VALID status.
Oracle cannot guarantee that the database upgrade is valid unless utlrp.sql has been run after upgrading and before starting the upgraded database for the first time. Not running utlrp.sql after performing an upgrade forces data dictionary objects to be compiled during their first access. The first user accessing the database suffers the performance hit for each of the invalid objects accessed at this point. Once recompilation of those invalid objects is completed, then normal processing returns. Running utlrp.sql ensures that the database is ready for use after upgrading. Any errors found are reported immediately and can be fixed before users of the upgraded database encounter problems.
3.7 About the catupgrd.sql Script in Earlier Releases of Oracle Database
Earlier releases of Oracle Database used the catupgrd.sql Upgrade Utility to process the upgrade. Oracle strongly recommends that starting with Oracle Database 12c, you use the catctl.pl Parallel Upgrade Utility, which replaces catupgrd.sql and provides both parallel processing mode and serial mode. The information about catupgrd.sql is provided here for backward compatibility with any custom scripts or processes that you use for upgrading. You must execute the catupgrd.sql script from the Oracle Database 12c environment.
Note:
If you runcatupgrd.sql by itself, then catuppst.sql does not run as part of the upgrade process. The catuppst.sql script must be run after catupgrd.sql completes.See Also:
"Deprecation of catupgrd.sql Script and Introduction of New catctl.pl Utility," for information about running the earlier Upgrade UtilityThe catupgrd.sql script creates and alters certain data dictionary tables. It also upgrades or installs the following database components in the new Oracle Database 12c database:
-
Oracle Database Catalog Views
-
Oracle Database Packages and Types
-
JServer JAVA Virtual Machine
-
Oracle Database Java Packages
-
Oracle XDK
-
Oracle Real Application Clusters
-
Oracle Workspace Manager
-
Oracle Multimedia
-
Oracle XML Database
-
OLAP Analytic Workspace
-
Oracle OLAP API
-
Oracle Text
-
Oracle Spatial and Graph
-
Oracle Data Mining
-
Oracle Label Security
-
Messaging Gateway
-
Oracle Database Vault
-
Oracle Application Express
3.8 About the catuppst.sql Script
The catuppst.sql script generates informational messages and log files during the upgrade. DBUA and catctl.pl automatically run catuppst.sql. Run this script separately if any errors occurred during the manual upgrade.
The catuppst.sql script, which is located in the ORACLE_HOME/rdbms/admin directory, performs remaining upgrade actions that do not require the database to be in UPGRADE mode. This script also automatically applies the latest Oracle patch set update (PSU).
An example of the catuppst.sql output is as follows:
Generating apply and rollback scripts...
Check the following file for errors:
Apply script: .*
Rollback script: .*
Executing script file...
Updating registry...
Check the following log file for errors:

Generating apply and rollback scripts...
Check the following file for errors:
.../cfgtoollogs/catbundle/catbundle_PSU_*.log
Apply script:
.../rdbms/admin/catbundle_PSU_*_APPLY.sql
Rollback script:
.../rdbms/admin/catbundle_PSU_*_ROLLBACK.sql
Executing script file...

Updating registry...
Check the following log file for errors:
.../cfgtoollogs/catbundle/catbundle_PSU_PDB_name.log
3.9 About Transporting and Upgrading a Database (Full Transportable Export/Import)
The Full Transportable Export/Import feature of Oracle Data Pump provides two options, which are described in detail in Oracle Database Administrator's Guide. The two options are:
-
Using a file-based Oracle Data Pump export/import
-
Using a non-file based network mode Oracle Data Pump import
See Also:
-
Information about transporting a database using an export dump file in Oracle Database Administrator's Guide
-
The full procedure in the Oracle Database Administrator's Guide for transporting a database over the network
3.10 Troubleshooting the Upgrade for Oracle Database
Oracle provides troubleshooting tips for errors or issues you may encounter while upgrading your database. To learn about important changes that affect this release, be sure to read Chapter 8, "Deprecated and Desupported Features for Oracle Database 12c."
This section contains the following topics:
-
Error ORA-00018 for DBCA Processes with Release 11.1.0.7 Databases
-
Error ORA-00020 Maximum Number of Processes Exceeded When Running utlrp.sql
-
Running the DBMS_DST Package After Upgrade Can Result in ORA-01822
-
Continuing Upgrades After Server Restarts (ADVM/ACFS Driver Error)
-
Understanding Component Status of the Post-Upgrade Status Tool
-
Error ORA-27248: sys.dra_reevaluate_open_failures is running
-
Oracle Database Enterprise User Security, OLS-OID, and Provisioning Profile Error
-
ASM Loses Rolling Migration State If CRS Shutdown On All Nodes
-
Data Type Versioning Could Cause Cross-Version Replication (ORA-26656)
3.10.1 About Starting Oracle Database in Upgrade Mode
Once the database is started in upgrade mode, only queries on fixed views execute without errors until after you run the catctl.pl script. Before running an upgrade script, queries on any other view or the use of PL/SQL returns an error.
Errors described in this section might occur when attempting to start the new Oracle Database 12c database. Some of these errors write to the alert log and not to your session. If you receive any of these errors, then issue the SHUTDOWN ABORT command to shut down the database and correct the problem.
-
ORA-00401: the value for parameter compatible is not supported by this releaseThe
COMPATIBLEinitialization parameter is set to a value less than11.0.0. -
ORA-39701: database must be mounted EXCLUSIVE for UPGRADE or DOWNGRADEThe
CLUSTER_DATABASEinitialization parameter is set toTRUEinstead ofFALSE. -
ORA-39700: database must be opened with UPGRADE optionThe
STARTUPcommand was issued without theUPGRADEkeyword. -
See Also:
Ora-00704, Ora-39700: Database Must Be Opened With Upgrade Option (Doc ID 1349722.1) on My Oracle Support athttp://support.oracle.com -
ORA-00336: log file size xxxx blocks is less than minimum 8192 blocksA redo log file size is less than 4 MB:
If errors appear listing desupported initialization parameters, then make a note of the desupported initialization parameters and continue with the upgrade. Remove the desupported initialization parameters the next time you shut down the database.
3.10.2 Running DBUA with Different ORACLE_HOME Owner
When upgrading your database, DBUA expects that both the source (pre-12c) Oracle home and the destination (new 12c) Oracle home are owned by the same user. If this is not the case in your environment, then you need to make some changes to database file permissions and pass additional parameters to DBUA. Otherwise on the DBUA Prerequisite Checks page you will see the "upgrade.xml not found" error, and you will not be able to proceed with the upgrade.
-
First, ensure all database files (data files, the redo file, control files, archive log destination, recovery area, spfile, and password file) are readable and writable by both the new 12c and pre-12c binary owners. This can be achieved by having both users in the same group, such as "oinstall" and by giving the group read/write access to all the database files.
-
Run DBUA by specifying the
-logdircommand line switch, and provide a directory that both 12c and pre-12c binary owners can write to, for example,/tmp. DBUA will use this directory to store the output from the Pre-upgrade Information Tool (which you execute on the pre-12c instance running under the pre-12c binary owner) and any DBUA logs generated by the 12c binary owner during upgrade.-
For example, run DBUA as follows at the command line:
dbua -logdir /tmp
-
3.10.3 Oracle Database Upgrade Script Termination Errors
If you did not run the Pre-Upgrade Information Tool before starting the upgrade, then the catctl.pl and catupgrd.sql scripts terminate with errors as follows:
ORA-00942: table or view does not exist
ORA-00904: "TZ_VERSION": invalid identifier
ORA-01722: invalid number
If you receive any of these errors, issue the SHUTDOWN ABORT statement. Then revert to the original Oracle home directory, and run the Pre-Upgrade Information Tool (ultu121i.sql) as described in "About the Pre-Upgrade Information Tool for Oracle Database".
3.10.4 Resource Limits for Upgrading Oracle Database
If you run out of resources during the upgrade, then increase the resource allocation. After increasing the resource allocation, you should perform a SHUTDOWN ABORT and restart the instance (in UPGRADE mode) before rerunning the catupgrd.sql script or restarting DBUA.
The resources that generally require increases for a new Oracle Database release are as follows:
-
Typically if your
SYSTEMtablespace size is insufficient, you receive an error message during the upgrade as follows:ORA-01650: unable to extend rollback segment string by string in tablespace string ORA-01651: unable to extend save undo segment by string for tablespace string ORA-01652: unable to extend temp segment by string in tablespace string ORA-01653: unable to extend table string.string by string in tablespace string ORA-01654: unable to extend index string.string by string in tablespace string ORA-01655: unable to extend cluster string.string by string in tablespace string
To avoid these errors, set
AUTOEXTEND ON MAXSIZE UNLIMITEDfor theSYSTEMandSYSAUXtablespaces. -
You might require larger shared memory pool sizes in some cases. The error message indicates which shared memory initialization parameter must be increased.
ORA-04031: unable to allocate string bytes of shared memory ("string","string","string","string")
See Also:
Oracle Database Administrator's Guide for information about using manual shared memory management -
Rollback segments/undo tablespace
If you are using rollback segments, then you must have a single large (100 MB)
PUBLICrollback segment online while the upgrade scripts are being run. Smaller public rollback segments should be taken offline during the upgrade. Typically you get the following error if your rollback segment size is insufficient:ORA-01562: failed to extend rollback segment number string
If you are using an undo tablespace, then be sure it is at least 400 MB.
-
If you are using a Fast Recovery Area and it fills up during the upgrade, then the following error appears in the alert log, followed by suggestions for recovering from the problem:
ORA-19815: WARNING: db_recovery_file_dest_size of string bytes is 98.99%
used, and has string remaining bytes available.
Identify the root cause of the problem and take appropriate actions to proceed with the upgrade. To avoid issues during the upgrade, increase the amount of space available in your Fast Recovery Area before starting the upgrade.
3.10.5 SQL*Plus Edition Session Startup Error for Oracle Database
If an upgrade script or command running in SQL*Plus set the EDITION parameter, then Oracle Database cannot start properly afterward and error SP2-1540: "Oracle Database cannot startup in an Edition session" is thrown. To avoid this problem, after running catugrd.sql or any SQL*Plus session where this parameter is changed, exit the SQL*Plus session and restart the instance in a different session.
3.10.6 Manual Workaround for ORA-01408 on Oracle Database Index
The ORA-01408 error on the index is a known problem with Oracle Application databases, because the same index exists with a different name in these databases.
SQL> create index system.repcat$_audit_column_f2_idx on
2  system.repcat$_audit_column(base_sname,base_oname,base_conflict_type_id,
3  base_reference_name)
4  /
system.repcat$_audit_column(base_sname,base_oname,base_conflict_type_id,
                          *ERROR at line 2:
ORA-01408: such column list indexed
The workaround is to drop the REPCAT$_AUDIT_COLUMN_IDX1 index and rerun the upgrade as described in "Rerunning the Upgrade for Oracle Database".
3.10.7 Error ORA-00018 for DBCA Processes with Release 11.1.0.7 Databases
If you are using Oracle Grid Infrastructure and you want to create an Oracle RAC release 11.1.0.7 database, then you may need to increase the DBCA default for session processes. For Oracle Database 12c, DBCA sets the default value for processes to 300. In earlier releases, DBCA set the default value to 150.
If you see the error message "ORA-00018:maximum number of session exceeded," then change the default value for session processes in DBCA to 300. DBCA then successfully creates the release 11.1.0.7 database to use with Oracle Grid Infrastructure release 12.1.
3.10.8 Error ORA-00020 Maximum Number of Processes Exceeded When Running utlrp.sql
This error may indicate that your Oracle configuration does not have sufficient number of processes available for the recompile. Refer to documentation for more details about setting the PROCESSES parameter.
See Also:
Oracle Database Reference3.10.9 Running the DBMS_DST Package After Upgrade Can Result in ORA-01822
Running the DBMS_DST package after upgrading to Oracle Database 12c can result in the ORA-01882: time zone region not found error.
This error is returned if the time zone file version has been set incorrectly, which results in the region IDs of several time zone regions being stored incorrectly in the database. For example:
ERROR at line 1:
@  ORA-01882: time zone region not found
@  ORA-06512: at "SYS.DBMS_DST", line 113
@  ORA-06512: at "SYS.DBMS_DST", line 1101
@  ORA-06512: at line 1
To fix this problem, update the time zone version as described in "About Oracle Database Warnings for TIMESTAMP WITH TIME ZONE Data Type" and rerun the upgrade as described in "Rerunning the Upgrade for Oracle Database".
3.10.10 Continuing Upgrades After Server Restarts (ADVM/ACFS Driver Error)
On Windows platforms, an error may occur related to ADVM or ACFS drivers if a server restarts during an upgrade. You may see the following error message.
- ACFS-9427: Failed to unload ADVM/ACFS drivers. A system reboot is recommended, or ACFS-9428 Failed to load ADVM/ACFS drivers. A system reboot is recommended.
-
Cause: If you see these errors during an upgrade, then the cause is that the ADVM and ACFS drivers are still in use, and you must restart the system to start the new drivers.
-
Action: Complete the steps as described in the following procedures.
For nodes other than the first node (the node on which the upgrade is started):
-
Restart the node where the error occurs.
-
Run the root script on that node again.
For first nodes (the node on which the upgrade is started):
-
Complete the upgrade of all other nodes in the cluster.
-
Restart the first node.
-
Run the root script on the first node again.
-
To complete the upgrade, log in as root, and run the script
configToolAllCommands, located in the pathGrid_home/cfgtoollogs/configToolAllCommands.
See Also:
Oracle Grid Infrastructure Installation Guide for your operating system for more information about troubleshooting upgrade issues for clusters3.10.11 Understanding Component Status of the Post-Upgrade Status Tool
The utlu121s.sql Post-Upgrade Status Tool reports the status for database components after the upgrade. This tool can be run anytime after upgrade, post-upgrade, or after recompiling invalid objects with utlrp.sql. An example of the summary report is provided in "Sample Upgrade Summary Report for the Post-Upgrade Status Tool (utlu121s.sql)."
The following list briefly describes the status values that you might see:
-
Some objects for the component were invalid at the completion of the upgrade. If there were no errors during the component upgrade, then running
utlrp.sqlmight change the status toVALIDwithout rerunning the entire upgrade. Check theDBA_REGISTRYview after runningutlrp.sql. See "Scripts for Upgrading Oracle Database". -
VALIDThe component is valid with no errors.
-
LOADINGThe component is loading
-
LOADEDThe component has successfully finished loading.
-
UPGRADINGThe component is in process being upgraded.
-
The component has completed upgrading with no errors.
-
DOWNGRADINGThe component is in process being downgraded.
-
DOWNGRADEDThe component has completed downgrading with no errors.
-
REMOVINGThe component is in process being removed.
-
The component was not upgraded because it was removed from the database.
-
The server option required for the component was not installed or was not linked with the server. Check the
V$OPTIONview and the install logs. Install the component or relink the server with the required option, and then reruncatctl.pl. See "Scripts for Upgrading Oracle Database". -
The component upgrade script was not found in ORACLE_HOME. Check the install logs, install the component software, and then rerun
catctl.pl. See "Scripts for Upgrading Oracle Database".
See Also:
"Change to Upgrade Status Setting."3.10.11.1 Sample Upgrade Summary Report for the Post-Upgrade Status Tool (utlu121s.sql)
The Post-Upgrade Status Tool creates the upgrade summary report. The upgrade summary report contains the status of all components within the database as shown in Example 3-2, "Upgrade Summary Report for the Post-Upgrade Status Tool". The example shows the report for a multitenant container database (CDB) and the pluggable databases (PDBs).
After the upgrade completes, a copy of the report is placed in one of the following locations:
-
$ORACLE_BASE/cfgtoollogs/<db-unique-name>/upgrade/upg_summary.rpt
-
$ORACLE_HOME/cfgtoollogs/<db-unique-name>/upgrade/upg_summary.rpt
-
$ORACLE_HOME/rdbms/logs/upg_summary.rpt
The locations are shown in the order that utlu121s.sql uses to create the report. If it cannot create the report under the first directory scheme, then it tries the second and then the third location before it does not try further to write the report.
Example 3-2 Upgrade Summary Report for the Post-Upgrade Status Tool
Oracle Database 12.1 Post-Upgrade Status Tool 06-12-2014 20:37:07 . CDB$ROOT:1 Component Current Version Elapsed Time Name Status Number HH:MM:SS . Oracle Server . UPGRADED 12.1.0.2.0 00:14:26 JServer JAVA Virtual Machine . VALID 12.1.0.2.0 00:05:50 Oracle Real Application Clusters . OPTION OFF 12.1.0.2.0 00:00:01 Oracle Workspace Manager . VALID 12.1.0.2.0 00:01:19 Oracle Label Security . VALID 12.1.0.2.0 00:00:11 Oracle XDK . VALID 12.1.0.2.0 00:00:59 Oracle Text . VALID 12.1.0.2.0 00:00:32 Oracle XML Database . VALID 12.1.0.2.0 00:01:40 Oracle Database Java Packages . VALID 12.1.0.2.0 00:00:21 Oracle Multimedia . VALID 12.1.0.2.0 00:03:43 Oracle Database Vault . VALID 12.1.0.2.0 00:00:13 Post Upgrade . 00:01:25 Final Actions . 00:00:15 Total Upgrade Time: 00:31:47 PL/SQL procedure successfully completed. Elapsed: 00:00:00.11 . Oracle Database 12.1 Post-Upgrade Status Tool 06-12-2014 21:00:02 . PDB$SEED:2 Component Current Version Elapsed Time Name Status Number HH:MM:SS . Oracle Server . UPGRADED 12.1.0.2.0 00:13:19 JServer JAVA Virtual Machine . VALID 12.1.0.2.0 00:02:24 Oracle Real Application Clusters . OPTION OFF 12.1.0.2.0 00:00:01 Oracle Workspace Manager . VALID 12.1.0.2.0 00:00:51 Oracle Label Security . VALID 12.1.0.2.0 00:00:06 Oracle XDK . VALID 12.1.0.2.0 00:00:40 Oracle Text . VALID 12.1.0.2.0 00:00:11 Oracle XML Database . VALID 12.1.0.2.0 00:00:48 Oracle Database Java Packages . VALID 12.1.0.2.0 00:00:11 Oracle Multimedia . VALID 12.1.0.2.0 00:01:41 Oracle Database Vault . VALID 12.1.0.2.0 00:00:12 Post Upgrade . 00:01:19 Final Actions . 00:00:01 Total Upgrade Time: 00:22:24 PL/SQL procedure successfully completed. Elapsed: 00:00:00.08 . Oracle Database 12.1 Post-Upgrade Status Tool 06-12-2014 21:24:16 . CDB1_PDB1:3 Component Current Version Elapsed Time Name Status Number HH:MM:SS . Oracle Server . UPGRADED 12.1.0.2.0 00:13:05 JServer JAVA Virtual Machine . VALID 12.1.0.2.0 00:03:01 Oracle Real Application Clusters . OPTION OFF 12.1.0.2.0 00:00:02 Oracle Workspace Manager . VALID 12.1.0.2.0 00:01:01 Oracle Label Security . VALID 12.1.0.2.0 00:00:06 Oracle XDK . VALID 12.1.0.2.0 00:00:45 Oracle Text . VALID 12.1.0.2.0 00:00:15 Oracle XML Database . VALID 12.1.0.2.0 00:00:55 Oracle Database Java Packages . VALID 12.1.0.2.0 00:00:17 Oracle Multimedia . VALID 12.1.0.2.0 00:01:59 Oracle Database Vault . VALID 12.1.0.2.0 00:00:10 Post Upgrade . 00:01:18 Final Actions . 00:00:01 Total Upgrade Time: 00:23:33 PL/SQL procedure successfully completed. Elapsed: 00:00:00.12 . Oracle Database 12.1 Post-Upgrade Status Tool 06-12-2014 21:27:03 . CDB1_PDB2:4 Component Current Version Elapsed Time Name Status Number HH:MM:SS . Oracle Server . UPGRADED 12.1.0.2.0 00:14:01 JServer JAVA Virtual Machine . VALID 12.1.0.2.0 00:03:11 Oracle Real Application Clusters . OPTION OFF 12.1.0.2.0 00:00:02 Oracle Workspace Manager . VALID 12.1.0.2.0 00:01:05 Oracle Label Security . VALID 12.1.0.2.0 00:00:07 Oracle XDK . VALID 12.1.0.2.0 00:00:49 Oracle Text . VALID 12.1.0.2.0 00:00:12 Oracle XML Database . VALID 12.1.0.2.0 00:00:54 Oracle Database Java Packages . VALID 12.1.0.2.0 00:00:15 Oracle Multimedia . VALID 12.1.0.2.0 00:02:03 Oracle Database Vault . VALID 12.1.0.2.0 00:00:13 Post Upgrade . 00:01:18 Final Actions . 00:00:01 Total Upgrade Time: 00:24:51 PL/SQL procedure successfully completed. Elapsed: 00:00:00.11 . Oracle Database 12.1 Post-Upgrade Status Tool 06-12-2014 21:49:18 . CDB1_PDB3:5 Component Current Version Elapsed Time Name Status Number HH:MM:SS . Oracle Server . UPGRADED 12.1.0.2.0 00:13:57 JServer JAVA Virtual Machine . VALID 12.1.0.2.0 00:03:01 Oracle Real Application Clusters . OPTION OFF 12.1.0.2.0 00:00:02 Oracle Workspace Manager . VALID 12.1.0.2.0 00:01:07 Oracle Label Security . VALID 12.1.0.2.0 00:00:07 Oracle XDK . VALID 12.1.0.2.0 00:00:46 Oracle Text . VALID 12.1.0.2.0 00:00:12 Oracle XML Database . VALID 12.1.0.2.0 00:00:58 Oracle Database Java Packages . VALID 12.1.0.2.0 00:00:13 Oracle Multimedia . VALID 12.1.0.2.0 00:02:10 Oracle Database Vault . VALID 12.1.0.2.0 00:00:13 Post Upgrade . 00:01:17 Final Actions . 00:00:01 Total Upgrade Time: 00:24:42 PL/SQL procedure successfully completed. Elapsed: 00:00:00.10 . Oracle Database 12.1 Post-Upgrade Status Tool 06-12-2014 21:51:15 . CDB1_PDB4:6 Component Current Version Elapsed Time Name Status Number HH:MM:SS . Oracle Server . UPGRADED 12.1.0.2.0 00:13:41 JServer JAVA Virtual Machine . VALID 12.1.0.2.0 00:02:48 Oracle Real Application Clusters . OPTION OFF 12.1.0.2.0 00:00:04 Oracle Workspace Manager . VALID 12.1.0.2.0 00:00:58 Oracle Label Security . VALID 12.1.0.2.0 00:00:07 Oracle XDK . VALID 12.1.0.2.0 00:00:40 Oracle Text . VALID 12.1.0.2.0 00:00:15 Oracle XML Database . VALID 12.1.0.2.0 00:00:50 Oracle Database Java Packages . VALID 12.1.0.2.0 00:00:16 Oracle Multimedia . VALID 12.1.0.2.0 00:02:04 Oracle Database Vault . VALID 12.1.0.2.0 00:00:15 Post Upgrade . 00:01:16 Final Actions . 00:00:01 Total Upgrade Time: 00:23:54 PL/SQL procedure successfully completed. Elapsed: 00:00:00.08 . Oracle Database 12.1 Post-Upgrade Status Tool 06-12-2014 22:08:18 . CDB1_PDB5:7 Component Current Version Elapsed Time Name Status Number HH:MM:SS . Oracle Server . UPGRADED 12.1.0.2.0 00:09:42 JServer JAVA Virtual Machine . VALID 12.1.0.2.0 00:02:31 Oracle Real Application Clusters . OPTION OFF 12.1.0.2.0 00:00:01 Oracle Workspace Manager . VALID 12.1.0.2.0 00:00:52 Oracle Label Security . VALID 12.1.0.2.0 00:00:05 Oracle XDK . VALID 12.1.0.2.0 00:00:42 Oracle Text . VALID 12.1.0.2.0 00:00:13 Oracle XML Database . VALID 12.1.0.2.0 00:00:44 Oracle Database Java Packages . VALID 12.1.0.2.0 00:00:12 Oracle Multimedia . VALID 12.1.0.2.0 00:01:44 Oracle Database Vault . VALID 12.1.0.2.0 00:00:12 Post Upgrade . 00:01:08 Final Actions . 00:00:01 Total Upgrade Time: 00:18:44 PL/SQL procedure successfully completed. Elapsed: 00:00:00.08 .
3.10.12 Standard Edition Starter Database and Components with Status OPTION OFF
When the Standard Edition (SE) starter database is upgraded, components that are not included with the starter database cannot be upgraded by the SE server because they require options that are not installed in the Standard Edition.
After the upgrade, components may have a STATUS value of OPTION OFF in the DBA_REGISTRY view, and there are some invalid objects in the associated component schemas. The Database Upgrade Assistant (DBUA) shows unsuccessful upgrades for these components.
3.10.13 Adjusting Oracle ASM Password File Location After Upgrade
The Oracle ASM password file location is not shown in the command output when you invoke srvctl config asm after a Grid Infrastructure upgrade. The location of the password file is not automatically passed to the new Oracle ASM disk group. To enable SRVCTL to have the password file location after upgrade, you must advance the diskgroup compatibility setting and create a PWFILE in the diskgroup. Then SRVCTL will report the configured location of the shared PWFILE.
Follow the procedure in Oracle Automatic Storage Management Administrator's Guide for managing a shared password file in a disk group.
3.10.14 Error ORA-27248: sys.dra_reevaluate_open_failures is running
If DBUA failed with error "ORA-27248: sys.dra_reevaluate_open_failures is running" when upgrading the database, then the job DRA_REEVALUATE_OPEN_FAILURES is running and causes upgrade failure. You need to ensure that the job is stopped.
In a job definition, if ALLOW_RUNS_IN_RESTRICTED_MODE is set to TRUE, the job is permitted to run when the database is in restricted or upgrade mode, provided that the job owner is permitted to log in during this mode. The default setting is FALSE.
You can use the following query to see the state of any jobs that may be running:
SQL> select OBJECT_NAME, Owner, OBJECT_TYPE from dba_objects whereobject_name like '%DRA_REEVA%';
3.10.15 Oracle Database Enterprise User Security, OLS-OID, and Provisioning Profile Error
After upgrading databases that use OLS and a standby database, you might see ORA-16000 (database open for read-only access). After switchover, the Provisioning profile should be updated with the connect information of the new primary. Otherwise, the policies will continue to get propagated to the new standby (old primary) and will fail with ORA-16000. See Oracle Database Enterprise User Security Administrator's Guide for information about the additional steps required for upgrading Oracle Database from release 10g (10.1) and higher to Oracle Database 12c.
3.10.16 32K Migration Error with utl32k.sql and MAX_STRING_SIZE
An error is generated if the initialization parameter MAX_STRING_SIZE is set to EXTENDED but the 32K migration had not completed running the utl32k.sql script. The database upgrade will terminate with the following error:
SELECT TO_NUMBER('32K_MIGRATION_NOT_COMPLETED')
                    *
      ERROR at line 1:
      ORA-01722: invalid number
The database upgrade does not automatically run the utl32k.sql script and does not perform the 32K migration.
To complete the upgrade and the 32K migration after upgrading:
-
Reset the initialization parameter
MAX_STRING_SIZEtoSTANDARD. -
Restart the database in
UPGRADEmode. -
Rerun the upgrade, either with DBUA or the manual procedure.
-
After the database has been upgraded, set the initialization parameter
MAX_STRING_SIZEtoEXTENDED. -
Restart the database in
UPGRADEmode. -
Run
../rdbms/admin/utl32k.sql.
The upgraded database will complete the 32K migration and will support the EXTENDED parameter.
3.10.17 ASM Loses Rolling Migration State If CRS Shutdown On All Nodes
Oracle Automatic Storage Management (Oracle ASM) loses the rolling migration state if Cluster Ready Services (CRS) shuts down on all nodes. Consider the following scenario of four nodes (node1, node2, node3, and node4) that are at Oracle Database release 11.2.0.2 and being upgraded to release 12.1.0.2.
-
Node1 and node2 are upgraded to 12.1.0.2 and running.
-
Node3 and node 4 are still at 11.2.0.2 and running.
-
Now consider that there is an outage where all CRS stacks are down, which leaves the cluster in a heterogeneous state (that is, two nodes at 11.2.0.2 and two nodes at 12.1.0.2).
To proceed with the upgrade, only nodes at release 11.2.0.2 (i.e., node3 or node4 or both) should be started and the following command needs to be executed: ALTER SYSTEM START ROLLING MIGRATION TO '12.1.0.2' command on the Oracle ASM instance on node3 or node4 before starting any 12.1.0.2 node.
Note that before executing above step to bring the Oracle ASM cluster back into rolling migration, you cannot start two nodes of different versions in the cluster. If you do so, one of the Oracle ASM versions will fail with either the ORA-15153 or ORA-15163 error message.
Continue the upgrade procedure as already documented from this point forward.
3.10.18 Data Type Versioning Could Cause Cross-Version Replication (ORA-26656)
As part of release 12.1.0.2, versioning of data types that could be attributes of Oracle object types have been introduced (reference Bug 18897657). Because of this feature, cross-version replication between release 12.1.0.1 and release 12.1.0.2 databases might be affected resulting in the ORA-26656 error.
If any user-defined object types contain attributes of DATE, TIMESTAMP, TIMESTAMP WITH TIME ZONE, TIMESTAMP WITH LOCAL TIME ZONE, BINARY_FLOAT, BINARY_DOUBLE, NCHAR, NVARCHAR2, NCLOB, ANYDATA, etc., you must apply the mandatory Patch Set Update 18038108 to all release 12.1.0.1 instances.
3.10.19 Oracle XML DB Errors ORA-64123 and ORA-14097
The issue described in this section is for upgrading release 11.2.0.2 Oracle Database only.
The following scenario will cause the ALTER TABLE EXCHANGE PARTITION statement to fail with errors:
On an 11.2.0.2 database, you create an XMLType table or a table with an XMLType column that is partitioned and then create a structured XMLIndex on the table. Next, you upgrade the 11.2.0.2 database to Oracle Database 12c or above. If you execute the ALTER TABLE EXCHANGE PARTITION statement on one of the base table partitions with another partition or table that is created in the Oracle Database 12c database with the same structure and similar XMLIndex, then it will fail with the following error:
ORA-64123: XMLIndex DDL: failure of a recursive DDL
ORA-14097: column type or size mismatch in ALTER TABLE EXCHANGE PARTITION
This is not an issue if your index was created on a non-11.2.0.2 database. 11.2.0.2 is the only database release with this issue. Other database releases, like 11.2.0.1 and 11.2.0.3, do not have this issue.
The workaround is as follows: after upgrading to Oracle Database 12c or later, drop and re-create the structured XMLIndex on the table where the index was upgraded from release 11.2.0.2.
3.11 Rerunning the Upgrade for Oracle Database
When upgrading Oracle Database, the upgrade process can be rerun or restarted with DBUA or with the catctl.pl script.
You can use the following methods to rerun the upgrade:
3.11.1 Rerunning the Upgrade with the Upgrade (catctl.pl) Script
You can rerun the upgrade with the catctl.pl script. Also see "Options for Rerunning the Upgrade for a Multitenant Database (CDB)."
-
Shut down the database. For a non-CDB and a CDB, the syntax is the same.
SQL> SHUTDOWN IMMEDIATE
-
Restart the database in
UPGRADEmode.For a non-CDB:
SQL> STARTUP UPGRADE
For a CDB:
SQL> STARTUP UPGRADE alter pluggable database all open upgrade;
-
Rerun
catctl.pl.Note:
You can rerun thecatctl.plscript as many times as necessary. For a CDB you can reruncatctl.plfor a specific PDB. For example, for a PDB named PDB1:$ORACLE_HOME/perl/bin/perl catctl.pl -n 4 -l $ORACLE_HOME/diagnostics catupgrd.sql -c 'PDB1'
-
Run
utlu121s.sql, the Post-Upgrade Status Tool, which provides a summary of the status of the upgrade in the spool log. You can runutlu121s.sqlany time before or after completing the upgrade.In a non-CDB:
SQL> @rdbms/admin/utlu121s.sql
In a CDB:
$ORACLE_HOME/perl/bin/perl catcon.pl -n 1 -e -b utlu121s -d '''.''' utlu121s.sql
If the
utlu121s.sqlscript returns errors or shows components that are notVALIDor not the most recent release, then see "Troubleshooting the Upgrade for Oracle Database" for more information. -
Important: The
catuppst.sqlscript is run as part of the upgrade process unless the upgrade returns errors during the process. Check the log file for "Started: catuppst.sql" to verify thatcatuppst.sqlran during the upgrade process. Ifcatuppst.sqlhas not run, then proceed to runcatuppst.sqlas shown in this step. Warning messages are also displayed when runningcatctl.plindicating thatcatuppst.sqlwas not run during the upgrade.Run
catuppst.sql, which is located in theORACLE_HOME/rdbms/admindirectory, as follows:$ORACLE_HOME/perl/bin/perl catcon.pl -n 1 -e -b catuppst -d '''.''' catuppst.sql
The log file
catuppst0.logwill be generated with the results of the post upgrade. -
Run
utlrp.sqlto recompile any remaining stored PL/SQL and Java code.$ORACLE_HOME/perl/bin/perl catcon.pl -n 1 -e -b utlrp -d '''.''' utlrp.sql
The log file
utlrp0.logwill be generated with the results of the re-compilations.Verify that all expected packages and classes are valid.
In a single PDB (
PDB1in this example), open the PDB in normal mode as follows:alter pluggable database PDB1 open;
Run
catcon.plto invokeutlrp.sqlin the PDB to recompile any remaining stored PL/SQL and Java code. Use the following syntax:$ORACLE_HOME/perl/bin/perl catcon.pl -n 1 -e -b utlrp -d '''.''' -c 'PDB1' utlrp.sql
In a non-CDB:
SQL> SELECT count(*) FROM dba_invalid_objects;
SQL> SELECT distinct object_name FROM dba_invalid_objects;
In an entire CDB:
SQL> ALTER SESSION SET CONTAINER = "CDB$ROOT"
SQL> SELECT count(*) FROM dba_invalid_objects;
SQL> SELECT distinct object_name FROM dba_invalid_objects;
SQL> ALTER SESSION SET CONTAINER = "PDB$SEED"
SQL> SELECT count(*) FROM dba_invalid_objects;
SQL> SELECT distinct object_name FROM dba_invalid_objects;
SQL> ALTER SESSION SET CONTAINER = "PDB1"
SQL> SELECT count(*) FROM dba_invalid_objects;
SQL> SELECT distinct object_name FROM dba_invalid_objects;
Note:
If the Pre-upgrade Information Tool detectedINVALIDobjects and populated theregistry$sys_inv_objsandregistry$nonsys_inv_objstables, then executeORACLE_HOME/rdbms/admin/utluiobj.sqlto display only those objects which are newly invalid because of the upgrade process. Theutluiobj.sqlscript only displays objects that are nowINVALIDbut which wereVALIDbefore the upgrade. -
Run
utlu121s.sqlagain to verify that all issues have been fixed.In a non-CDB:
SQL> @rdbms/admin/utlu121s.sql
In a CDB:
$ORACLE_HOME/perl/bin/perl catcon.pl -n 1 -e -b utlu121s -d '''.''' utlu121s.sql
-
Exit SQL*Plus.
-
If you are upgrading a cluster database from releases 10.2, 11.1, or 11.2, then upgrade the database configuration in Oracle Clusterware using the following command:
$ srvctl upgrade database -d db-unique-name -o Oracle_home
where
db-unique-nameis the database name assigned to it (not the instance name), andOracle_homeis the Oracle home location in which the database is being upgraded.
Your database is now upgraded to Oracle Database 12c. You are ready to complete the procedures described in Chapter 4, "Post-Upgrade Tasks for Oracle Database".
3.11.2 Options for Rerunning the Upgrade for a Multitenant Database (CDB)
Depending on the configuration of your multitenant database (CDB), there are several scenarios for rerunning the upgrade. You may opt to do the following:
-
Rerun the Upgrade While Other PDBs Are Online Using an Exclusion List
-
Rerun the Upgrade Using an Inclusion List to Specify a CDB or PDBs
-
Restarting the Upgrade from a Specific Phase that Failed Using -p
3.11.2.1 Rerun the Entire Upgrade for the CDB
You may need to rerun the entire upgrade in the case where several different issues occur during the first attempt. This example demonstrates reupgrading the CDB$ROOT, PDB$SEED and containers when a problem such as running out of shared pool occurs.
-
Start the upgrade again.
SQL> startup upgrade; alter pluggable database all open upgrade; -
Run
catctl.plas follows:$ORACLE_HOME/perl/bin/perl $ORACLE_HOME/rdbms/admin/catctl.pl -d $ORACLE_ HOME/rdbms/admin -l $ORACLE_HOME/rdbms/log catctl.pl catupgrd.sql
The upgrade will be run again on all the containers included with
CDB$ROOTandPDB$SEED.
3.11.2.2 Rerun the Upgrade Only on Specified CDBs
You may rerun the upgrade only on one or more specified multitenant containers (CDBs). You can do this with an exclusion list. An exclusion list contains containers that you do not want to upgrade. An exclusion list uses the -C parameter option in catctl.pl. (You must use uppercase C for this parameter; it is case sensitive.) This method can come in handy when there are many PDBs to reupgrade.
In this example, the multitenant container database contains five PDBs. All the upgrades were successful except that CDB1_PDB1 and CDB1_PDB2 failed with an upgrade error. The goal is to run the upgrade in CDB1_PDB1 and CDB1_PDB2 containers only. You can achieve this by shutting down the entire multitenant database and restarting only the PDBs you want to upgrade.
-
Shutdown and then startup in upgrade mode.
SQL> shutdown immediate; startup upgrade; alter pluggable database CDB1_PDB1 open upgrade; alter pluggable database CDB1_PDB2 open upgrade; -
Show the status of the CDB and PDBs.
SQL> show pdbs CON_ID CON_NAME OPEN MODE RESTRICTED ---------- ------------------------------ ---------- ---------- 2 PDB$SEED MIGRATE YES 3 CDB1_PDB1 MIGRATE YES 4 CDB1_PDB2 MIGRATE YES 5 CDB1_PDB3 MOUNTED 6 CDB1_PDB4 MOUNTED 7 CDB1_PDB5 MOUNTED -
Rerun the upgrade excluding
CDB$ROOTandPDB$SEEDfrom the upgrade.$ORACLE_HOME/perl/bin/perl $ORACLE_HOME/rdbms/admin/catctl.pl -d $ORACLE_ HOME/rdbms/admin -l $ORACLE_HOME/rdbms/log catctl.pl -C 'CDB$ROOT PDB$SEED' catupgrd.sql
The upgrade reruns and completes on CDB1_PDB1 and CDB1_PDB2.
Note:
For Windows, the -C option must be specified with quotes around the CDB root name and PDB seed name, for example:... -C "CDB$ROOT PDB$SEED"
3.11.2.3 Rerun the Upgrade While Other PDBs Are Online Using an Exclusion List
In this example, the CDB$ROOT will be started up in normal mode and the containers: CDB1_PDB3, CDB1_PDB4, and CDB1_PDB5 are online. In this case the upgrade failed in containers CDB1_PDB1 and CDB1_PDB2, but succeeded in containers: CDB1_PDB3, CDB1_PDB4, and CDB1_PDB5. The DBA reviews the upgrade logs for CDB1_PDB3, CDB1_PDB4, and CDB1_PDB5 and brings these specific containers online.
To rerun upgrade on containers: CDB1_PDB1 and CDB1_PDB2 do the following:
-
Bring up
CDB$ROOTin normal mode and openCDB1_PDB1andCDB1_PDB2in upgrade mode.CDB1_PDB3,CDB1_PDB4,CDB1_PDB5are in normal mode. The example is as follows:SQL> startup; alter pluggable database CDB1_PDB1 open upgrade; alter pluggable database CDB1_PDB2 open upgrade; alter pluggable database cdb1_pdb3 open; alter pluggable database cdb1_pdb4 open; alter pluggable database cdb1_pdb5 open; -
Show the PDBs status.
SQL> show pdbs CON_ID CON_NAME OPEN MODE RESTRICTED ---------- ------------------------------ ---------- ---------- 2 PDB$SEED READ ONLY NO 3 CDB1_PDB1 MIGRATE YES 4 CDB1_PDB2 MIGRATE YES 5 CDB1_PDB3 READ WRITE NO 6 CDB1_PDB4 READ WRITE NO 7 CDB1_PDB5 READ WRITE NO -
Now rerun the upgrade, excluding
CDB$ROOTfrom the upgrade.$ORACLE_HOME/perl/bin/perl $ORACLE_HOME/rdbms/admin/catctl.pl -d $ORACLE_ HOME/rdbms/admin -l $ORACLE_HOME/rdbms/log catctl.pl -C 'CDB$ROOT' catupgrd.sql
For Windows, the -C option must be specified with quotes around the CDB root name and PDB seed name, for example:
...
-C "CDB$ROOT PDB$SEED"The upgrade reruns and completes on
CDB1_PDB1andCDB1_PDB2.
3.11.2.4 Rerun the Upgrade Using an Inclusion List to Specify a CDB or PDBs
Instead of using an exclusion list to rerun the upgrade, you can alternatively use an inclusion list to specify the CDB and/or PDBs you want to rerun the upgrading on. An inclusion list uses the -c parameter in catctl.pl as shown in this example:
$ORACLE_HOME/perl/bin/perl $ORACLE_HOME/rdbms/admin/catctl.pl -d $ORACLE_HOME/rdbms/admin -l $ORACLE_HOME/rdbms/log catctl.pl -c 'CDB1_PDB1 CDB1_PDB2' catupgrd.sql
The upgrade reruns and completes on CDB1_PDB1 and CDB1_PDB2.
3.11.2.5 Restarting the Upgrade from a Specific Phase that Failed Using -p
You can use catctl.pl to rerun an upgrade and skip upgrade phases that already have run successfully. To determine the phase number to restart, examine the upgrade log to identify where the first error occurred, and in what phase.
3.11.2.5.1 Reviewing Non-CDB Log Files for Failed Phases
Log files can span from catupgrd0...catupgrd7.log.
3.11.2.5.2 Reviewing CDB Log Files for Failed Phases
Log files for CDB$ROOT (CDBs) can span from catupgrd0...catupgrd7.log. Log files for Containers (PDBs) span from catupgrdpdbname0...catupgradepdbname7.log.
3.11.2.5.3 Procedure for Finding and Restarting Multitenant Upgrades from a Failed Phase
To restart a multitenant upgrade from a failed phase, first identify which PDB created the error and then search its appropriate log file.
To identify the PDB that caused a multitenant upgrade failure, look at the upgrade summary report, or review catupgrd0.log; this log contains the upgrade summary report at the end of the file.
Use this procedure to check each log file looking for errors:
-
Locate log files with errors. For example:
Linux and UNIX:
$ grep -i 'error at line' catupgrd*.log
Windows:
C:\> find /I "error at line" catupgrd*.log
The
greporfindcommand displays the filenames of log files in which an error is found. -
Check each log file that has an error and identify where the first error occurred. Use the text editor of your choice to review each log file. Search for the first occurrence of the phrase 'error at line'. When you find the phrase, then search backwards from the error (reverse search) for PHASE_TIME___START. For example:
PHASE_TIME___START 15 15-01-16 08:49:41
The number after PHASE_TIME___START is the phase number where the error has occurred. In this example, the phase number is15.
Each log file can have an error in it. Repeat this phrase check, and identify the phase number with errors for each log file that contains an error, and identify the log file that contains the lowest phase number.
The log file that contains the lowest phase number is the restart phase number. This is the phase number from which you restart the upgrade.
For example:
catupgrd0.logerror occurred in phase 15:PHASE_TIME___START 15 15-01-16 08:49:41
catupgrd1.logerror occurred in phase 19:PHASE_TIME___START 19 15-01-16 08:50:01
In this example, the restart phase number is 15. Ensure that you identify the first error seen in all the log files, so that you can restart the upgrade from that phase.
-
Restart the upgrade from the failed phase by changing directory to the running the catctl.pl command using the -p flag, and providing the restart phase number. In multitenant databases, also use the -c flag using the syntax
-c 'PDBname', wherePDBnameis the name of the PDB where the failure occurred.For example:
Non-CDB Oracle Database:
cd $ORACLE_HOME/rdbms/admin
$ORACLE_HOME/perl/bin/perl catctl.pl -p 15 catupgrd.sql
PDB in a multitenant Oracle Database (CDB):
cd $ORACLE_HOME/rdbms/admin
$ORACLE_HOME/perl/bin/perl catctl.pl -p 15 -c 'PDB1' catupgrd.sql
In both examples, the upgrade is restarted from phase 15, identified with the -p flag. In the multitenant example, the PDB with the error is identified with the -c flag.
In these examples, the upgrade starts from phase 15 and runs to the end of the upgrade.
-
(Optional) You can also run the phase that contained an error by specifying a stop phase, using the -P flag. Using a stop phase allows the upgrade to just rerun that phase in which the error occurred. You can determine quickly if the error is fixed by running it on the phase with the error, without running the entire upgrade.
In the following catctl.pl command example, the upgrade is restarted at phase 15, and it is stopped at the end of phase 15 using the -P flag to specify the stop phase:
cd $ORACLE_HOME/rdbms/admin
$ORACLE_HOME/perl/bin/perl catctl.pl -p 15 -P 15 -c 'PDB1' catupgrd.sql
After you confirm that the error is fixed in the phase with the error, you can then resume the upgrade after that phase.
For example, if you have confirmed that the error in phase 15 of your multitenant database upgrade of PDB1 is fixed, then you can use the following command to continue the upgrade at phase 16:
cd $ORACLE_HOME/rdbms/admin $ORACLE_HOME/perl/bin/perl catctl.pl -p 16 -c 'PDB1' catupgrd.sql